I built a super efficient DIY Smokeless Fire Pit, and you can too. If you’re looking for the best smokeless fire pit design, you’ve come to the right place!
Before we get started, make sure to follow me on YouTube, Facebook and Instagram to keep up with all my latest builds!
Check out some of my best posts on more DIY outdoor projects with easy instructions. Spruce up your yard and home while enjoying the outdoors. Click on the links below for details.
DIY Cornhole Boards with FREE Plans
DIY Raised Garden Bed Backyard Makeover
Here is what you’ll need for the project:
Tools Used
- Metal Bit Set
- 7 cu/ft Gorilla Cart
- 4’ Level
- ISOtunes Bluetooth Hearing Protection (10% off code: FTBT)
Materials/Supplies
Affiliate links are used on this page. See my disclosure page for info on affiliate programs.
How do you make a DIY Smokeless Fire Pit?
- Build a fire pit
- Add fire pit ring
- Increase air flow to bottom of fire pit
- Add holes to the top of the fire pit ring
- Add holes to the bottom of the fire pit ring
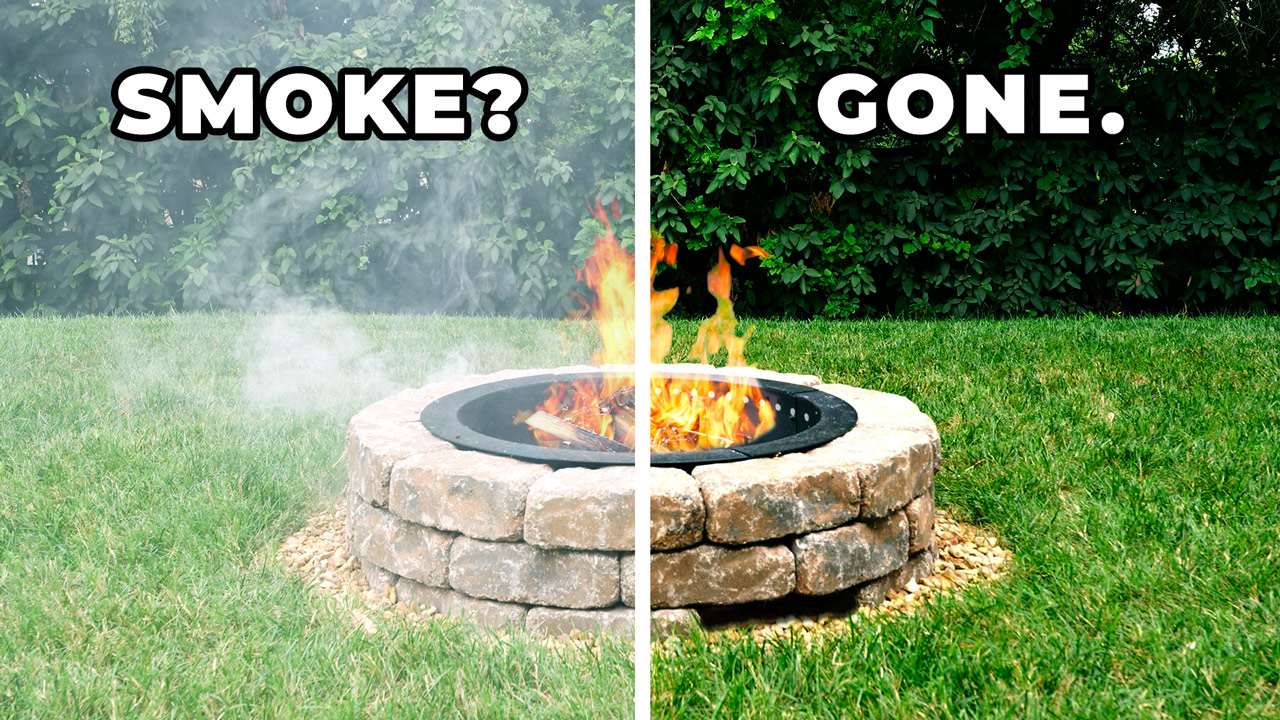
Who doesn’t want a smokeless fire pit? I’m going to show you exactly how you can build your own DIY Smokeless Fire Pit. But first, let’s figure out how it works.
What makes a smokeless fire pit smokeless?
A smokeless fire pit works when oxygen reaches the fire from the top and the bottom of the fire pit. This increases the air flow and helps the fire burn efficiently. It’s also important that the firewood is dry and the fire burns very hot.
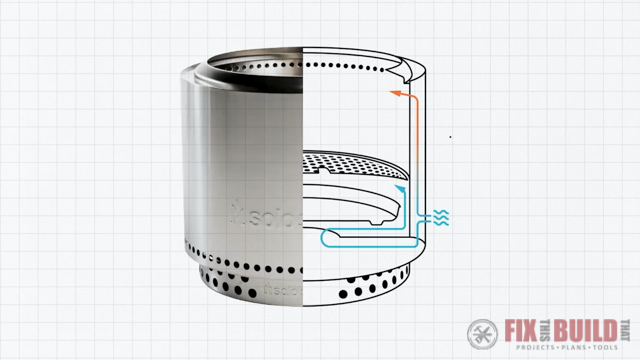
The most popular commercial smokeless fire pit it a Solo Stove. Solo Stoves are also designed to have oxygen flowing to the top and the bottom of the fire. The diagram below shows the oxygen flowing to the bottom and top of the fire pit.
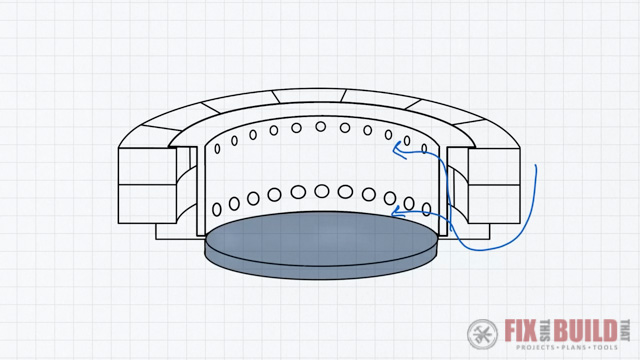
How does a DIY smokeless fire pit work?
- Oxygen reaches the fire from below to feed the fire (primary ignition).
- Heated oxygen also travels up through a chamber between the fire pit stones and the fire pit ring.
- The heated oxygen shoots out of holes drilled into the top of the fire pit ring (secondary combustion).
- The fire burns efficiently because it gets oxygen from the bottom and the top. This cuts down on smoke!
Why is my fire pit so smokey?
Traditional fire pits are smokey because oxygen can only reach the fire from the top. They don’t have air flowing through the base of the fire pit. As a result, the fire burn inefficiently which increases smoke.
Your fire pit may also be smokey if you’re burning wood that isn’t dry. Wet wood will always result in a smokey fire, no matter what fire pit you use.
How I made a DIY Smokeless Fire Pit
1. Build a Stone Fire Pit
First, I built my DIY Fire Pit. I designed the fire pit so it could also be turned into a smokeless fire pit. That means you can build one too with my complete step-by-step guide.
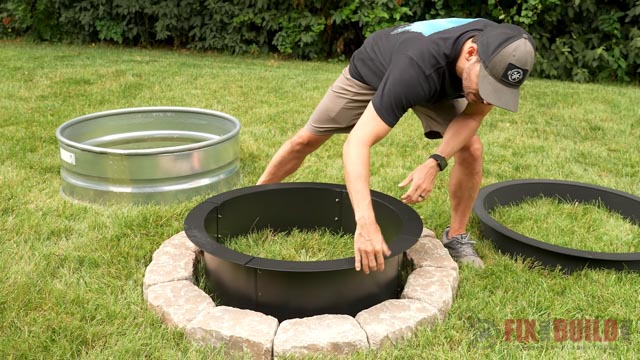
2. Add the Fire Pit Ring
Do you need to add a fire pit ring? Yes, you do. A DIY smokeless fire pit MUST have a fire pit ring in the center to work. And the fire pit ring needs to fit just right.
Why does this matter? You need to create a chamber between the fire pit stones and the fire pit ring. Adding the right fire pit ring is the best way to do this.
How should a DIY Smokeless Fire Pit Insert fit?
The most important step in building a DIY smokeless fire pit is making sure your fire pit insert fits the right way. What does that mean? Your DIY fire pit insert should:
- be slightly shorter than the fire pit (so it rests on the pavers)
- be about 2-3 inches narrower than the fire pit (to create a chamber)
- have a wide lip at the top (to cover the fire pit stones)
Your fire pit ring needs to fit inside the fire pit stones, with an inner gap all around of about 2-3 inches. That’s how we create the chamber inside the fire pit. AND the flange (or lip) needs to cover the stones by about an inch.
Which smokeless fire pit insert did I use?
If you plan to use the same tumbled fire pit stones that I used, you can use the same 30″ segmented fire pit ring I used too. The fire pit ring fits inside the fire pit very well.
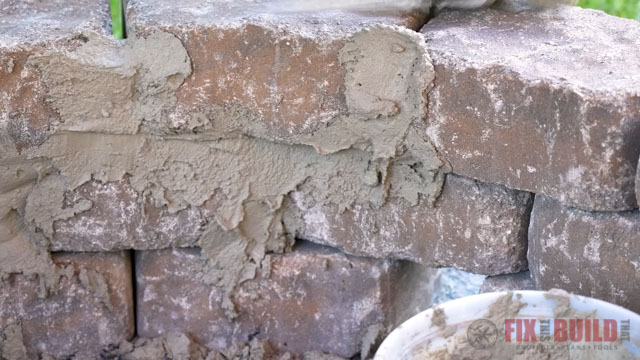
However, I did run into one problem… smoke escaping though cracks between the stones.
I solved that problem by adding mortar to the inside of the fire pit. It stopped the smoke from leaking out and strengthened the fire pit in general. Adding the mortar was easier to do than I thought, and it really worked.
Don’t add the mortar until after you remove the fire pit stones in Step 3.
How to pick a fire pit ring for a DIY Smokeless Fire Pit
Need to pick out your own fire pit ring for your smokeless fire pit? This is what I did to pick out my fire pit insert.
- Lay out fire pit stones in a circle on the ground at the store
- Place fire pit rings inside the stones to see how they fit
- Measure the inner diameter of the fire pit stones
- Look online for more fire pit insert options that could fit
This process was a bit of trial and error. You want stones that fit together tightly. While also finding a fire pit ring that fits inside just right.
3. Increase Air Flow to Bottom of Fire
Next we need to increase air flow to the bottom of the fire. To do this, I removed four pavers in the bottom row of my fire pit. These openings allowed more air to be sucked into the fire pit.
I tested the increased air flow with a smoke bomb. Watch me test my DIY Smokeless Fire Pit with smoke bombs and a fog machine in the video.
Why do we need to increase air flow?
To get a smoke-free fire, the fire needs to burn efficiently. Your fire will burn more efficiently if it has oxygen flowing to the fire at the top and at the bottom.
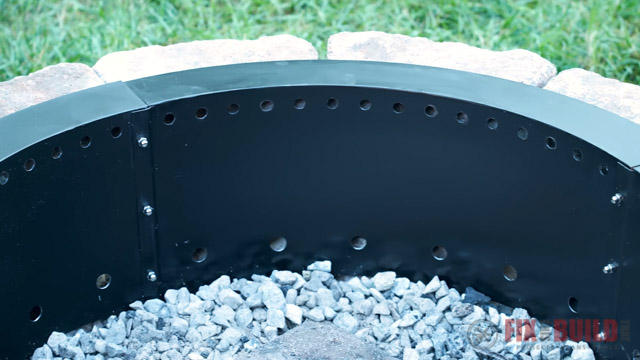
4. Add Holes at Top of Fire Pit Ring
The oxygen being sucked into the openings at the bottom of the fire pit needs somewhere to go. Adding holes to the top of the fire pit ring allows the heated oxygen to shoot out over the fire (secondary combustion).
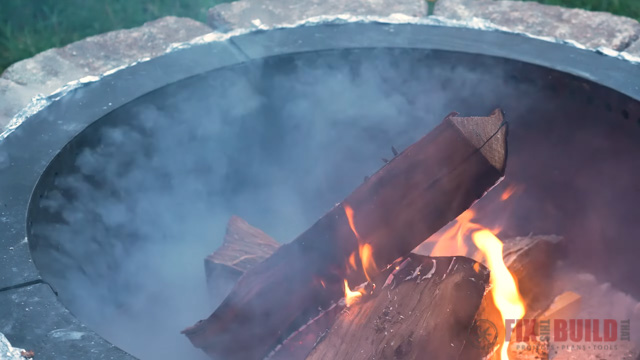
I tested my fire pit using a smoke machine. This made it easy to see the “smoke” coming out of the top holes.
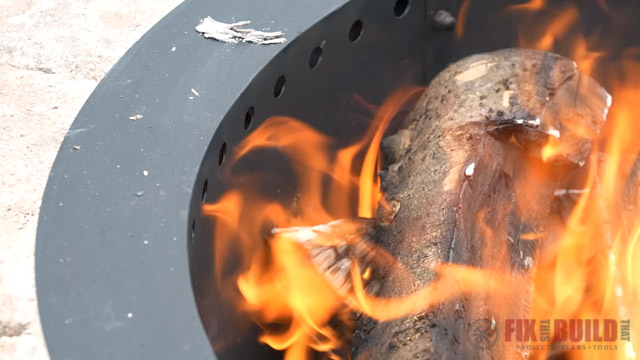
What is secondary combustion?
Secondary combustion is heated oxygen that shoots out over the top of the fire. This second dose of oxygen helps to cut the amount of smoke the fire puts off. You’re fire will need to be very hot for secondary combustion to occur.
How many holes should you add?
After repeated testing, I went with 60 holes 1/2 inches in diameter, spaced a 1-1/2 inches apart. I tested different sized holes and spacings to make sure this was the best combination.
And when I say I tested this, I mean it. I drilled 4 different sized holes with different spacings. And I used smoke bombs and a fog machine to see where the smoke went. Check out the video to see the testing in action.
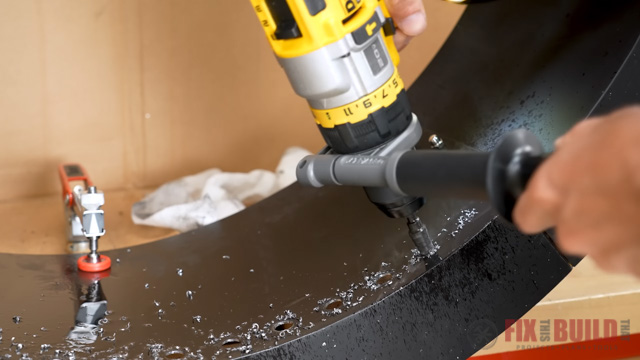
How do you drill holes in the fire ring?
- Mark the hole locations on blue painters tape
- Attach painter’s tape to the inside of the fire pit ring
- Use center punch to mark the metal
- Remove blue tape
- Drill 1/2 inch hole with a step bit
You can watch this process on the video.
5. Drill Holes at Bottom of Fire Pit Ring
For the fire to burn efficiently, it needs oxygen coming from the bottom of the fire pit. Drilling supply holes near the bottom of the fire pit ring gives oxygen a direct path to the fire (primary ignition)
What is primary ignition?
Primary ignition is the flow of oxygen to the base of the fire. In other words, it’s the oxygen that feeds the fire. Smokeless fire pits enable this oxygen to flow through the base of the fire pit.
How many holes should you add?
After more research, I went with 24 holes 1 inch in diameter, spaced 3-3/4″ apart.
How do you drill the supply holes?
- Mark the hole locations on blue painters tape
- Attach tape to inside of the fire pit ring
- First drill pilot holes
- Then use step bit to drill 1 inch holes
Once you’re done drilling holes in your smokeless fire pit ring, place it into the fire pit. You’re smokeless fire pit should be ready to go!
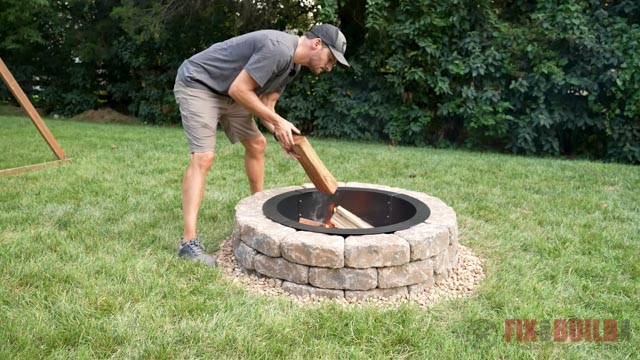
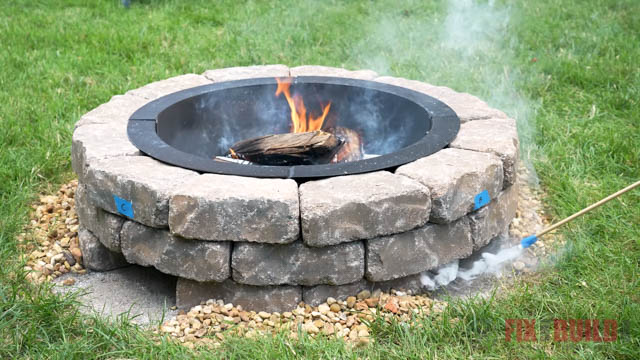
Test your DIY Smokeless Fire Pit!
Now for the fun part, build your first test fire! Make sure to use dry fire wood and feed the fire continually. Let the fire burn for at least 30 minutes before looking for a reduction in smoke. You want the fire to be very hot (550-700 degrees Fahrenheit) for secondary combustion to occur.
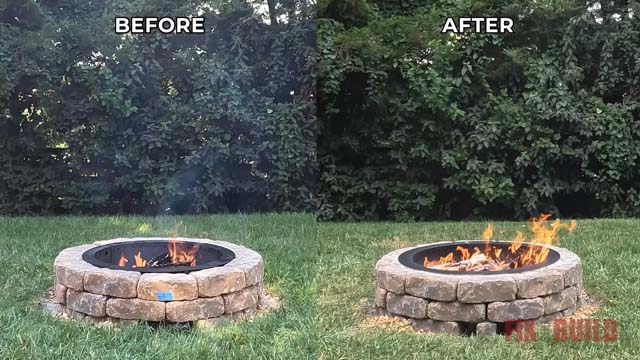
You can see that the smoke is all but gone! But what about secondary combustion? Did I ever get flames to shoot out of the top of my diy fire pit? Yes! I kept adding dry wood to the fire and eventually flames were shooting out of the holes.
FAQ
How do you make a smokeless fire pit?
Make a smokeless fire pit by creating openings in the base of your stone fire pit. Then add holes at the bottom and top of the fire pit ring. Insert the ring into the fire pit and build a hot fire!
Which fire pit stones should you use for a DIY smokeless fire pit?
The pavers you use to make a DIY smokeless fire pit should be able to form a tight circle. I used tumbled fire pit stones. Twelve stones formed a tight circle that had an inner diameter of about 33 inches. That’s a great size for my 30 inch fire pit ring to fit inside.
What if smoke escapes through cracks in the fire pit?
The tighter the fit of the fire pit stones, the less the oxygen can escape through cracks. But you may still have smoke that works it’s way out, especially if you use tumbled stones. An easy way to stop smoke from leaking out is to add quickset mortar to the inside of your stone fire pit.
What do you put in the bottom of a homemade fire pit?
We put a large square paver in the base of our DIY fire pit. This solid surface made cleaning up ash after the fire much easier. Lava rocks aren’t a good choice because ash mixes in with them and makes clean up a struggle.
DIY smokeless fire pit hole size?
Smokeless fire pits will need holes in the top and bottom of the fire pit ring. The best hole size for the top is 60 holes 1/2 inches in diameter, spaced a 1-1/2 inches apart. Holes at the bottom of the fire pit ring should be 24 holes 1 inch in diameter, spaced 3-3/4″ apart.
And that’s how to make the BEST DIY Smokeless Fire Pit! This is a fun project that you’ll enjoy for years to come. If you liked this project check out my other Outdoor Projects.
Did you know that I have bundle plans for more Home DIY Projects? Right now you can BUY 2 PLANS – GET 1 FREE! Click HERE.
These bundles give you detailed instructions for all of your home projects! No better time for Home Builds than NOW!
Have you ever wanted to build a backyard shed? Check out the plans for my Modern 10 x 12 Shed. Click HERE for the easy to follow plans.
Building Outdoor Furniture is easy with my Outdoor Furniture Bundle Plans. Click HERE to see.
Raised Planter Boxes are a great addition to your patio or porch. Click HERE for easy-to-follow plans.


