
Installing vinyl plank flooring for the first time? I’ve been there and it was a bit overwhelming honestly. You have to figure out the layout, know the best way to cut around obstacles, and if your walls or floor aren’t level then forget it. There are plenty of issues that can set your vinyl flooring install back. But today I’ll show you 10 Beginner Mistakes and how you can avoid them!
Check out the video below and see a few of the tools and supplies I used to make installing vinyl plank flooring a lot easier!
Materials/Supplies
Affiliate links are used on this page. See my disclosure page for info on affiliate programs.
10 Beginner Mistakes Installing Vinyl Plank Flooring
- Not sinking fasteners
- Leaving your baseboards on (If you hate quarter round)
- Forgetting to level floors
- Skipping undercutting door trim
- Not alternating plank designs
- Forgetting to calculate width of last row
- Not planning for corners
- Using the wrong underlayment
- Not planning for vents
- Thinking you need expensive tools
Mistake #1: Not Sinking Fasteners
The first thing you need for a vinyl plank install is a good, flat surface to lay it on. Once you’ve removed your old flooring (carpet, tile, etc) take a look at your floor’s surface. You’ll want to make sure there aren’t any fasteners sticking up. If you don’t lower your fasteners below the surface of the floors they may transfer through to the flooring itself.
To make sure your fasteners are lower than the surface of your floor, start by running the flat edge of a scraper or pry bar over them. 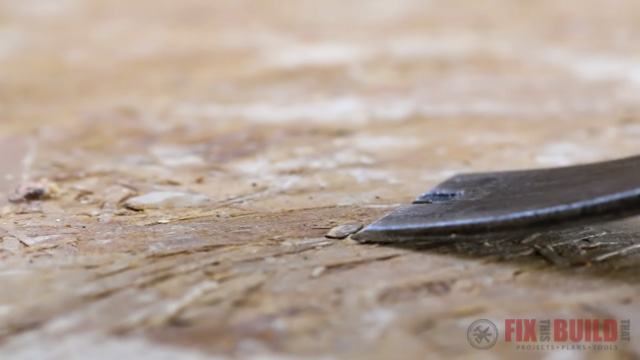
If your tool snags on anything then you need to sink it below the surface. When I was installing vinyl plank flooring in my bathroom I found some raised nails which I hammered down flush.
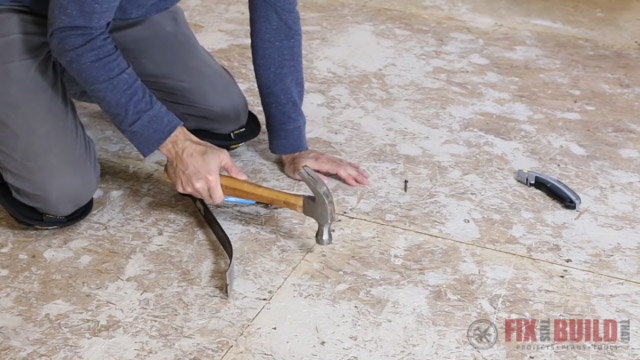
If you have screws that are sticking up too high, you can try to screw them down. If that doesn’t work just back them out and remove them.
Mistake #2: Leaving Your Baseboards Installed
The next mistake is probably more a matter of opinion. Leaving the baseboards installed definitely makes the job easier and is pretty common. But you’ll need a thick quarter round to hide the expansion gap as well as the gap between the height of the lower floor when taking out carpet. When I remove baseboards I use a trim pull tool which works really well and keeps the boards intact
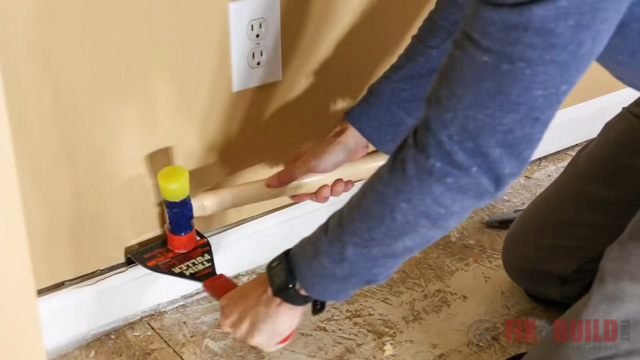
Personally I think the payoff of removing the baseboards is worth it for a nice clean look. The only time I left the baseboards on is when I installed vinyl floors in my laundry room. But that was because I had board and batten walls in the room and removing the baseboard would have been a HUGE pain.
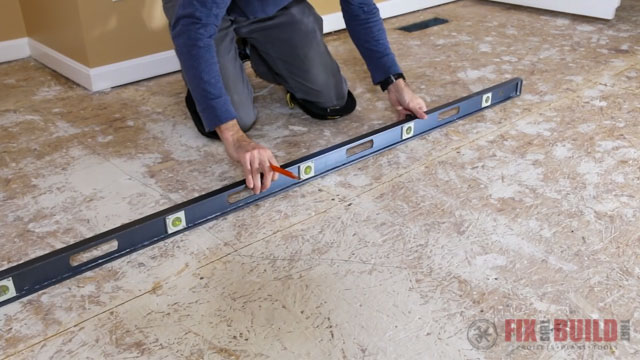
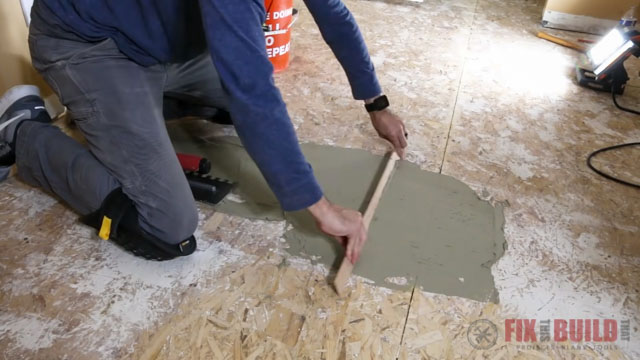
Mistake #3: Not Leveling the Subfloor
Making sure your subfloor is level is a crucial step you need to take before installing vinyl plank flooring. If you skip this step, you may wind up with floors that have gaps between the boards or click when you walk on them.
To check your floors for level, start by laying a long bubble level on the floors. Use your level to span across different areas while looking for any dips or humps. When we checked the floors in my niece’s room there was a big hump we had to deal with.
To fix the dip in the floor we used thinset that my brother-in-law Jason had left over from a tile job. Floor patch is a better product to use if you’re buying a fresh bag as it’s easier to feather out.
Start by laying down a thinset or floor patch, then use a trowel to spread it out. Next you’ll pull a strip of wood across the material to level it off. Just keep doing this until your dip is filled in.
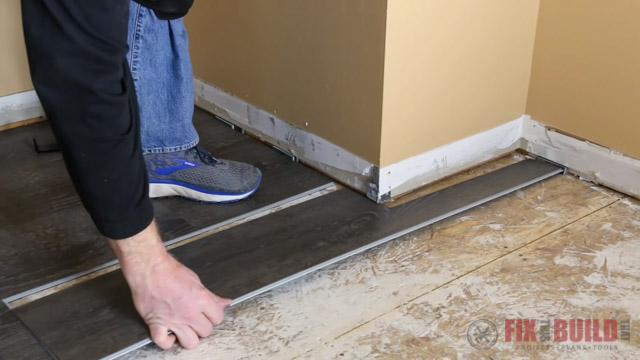
Installing Transition Strip
With the floor totally prepped we could start to install. And since we were starting at the corner where the door is, we needed to set up our transition now.
We used a T-molding transition that snaps into a metal channel. I marked the u-channel to fit the doorway and Jason cut it to size with a hacksaw. Then I cut the carpet and padding back so it would be out of the way.
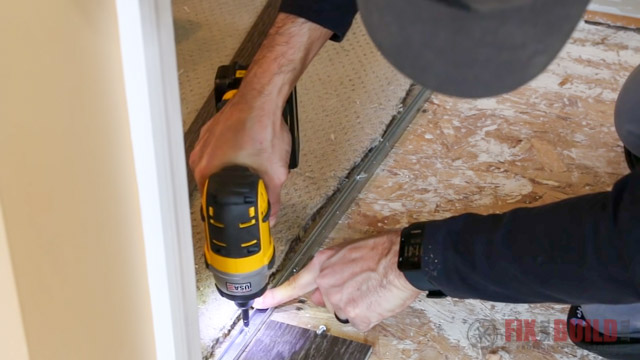
There were some tack strips that went into the hallway so we cut those off with a multitool. Then I set the channel in place and screwed it to the subfloor. This leads us to mistake #4…
Mistake #4: Not Undercutting Door Jam and Trim
Your transition strip should fit right under the door jam and possibly part of the trim. But if you don’t undercut the trim you’ll have to scribe the flooring around the trim. This means you’ll need to use caulk to cover the gaps. This doesn’t look good and will stick out like a sore thumb.
With the u-channel in place I could tell how far I needed to cut the door trim. I cut it flush by using a multitool and a piece of scrap flooring.
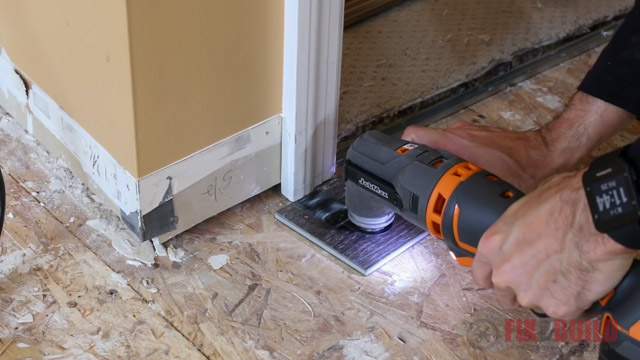
With the door jam cut, I was ready to start laying the flooring. Starting in the left corner of the longest wall near the door is a good rule of thumb. This lets the flooring run with the length of the room. And starting near the door will help hide any alignment issues that might show up at the end of a row.
Which leads us to Mistake #5
Mistake #5: Ending Rows with Small Boards
You know what doesn’t look good? Seeing tiny little pieces of boards at the end of a row. But with a little planning you can easily avoid this mistake.
Your flooring manufacturer should have instructions on how to calculate this, but the idea is pretty basic.
With 4’ planks you don’t want to end a row with less than an 8” piece. And you can avoid this by adjusting your starting plank.
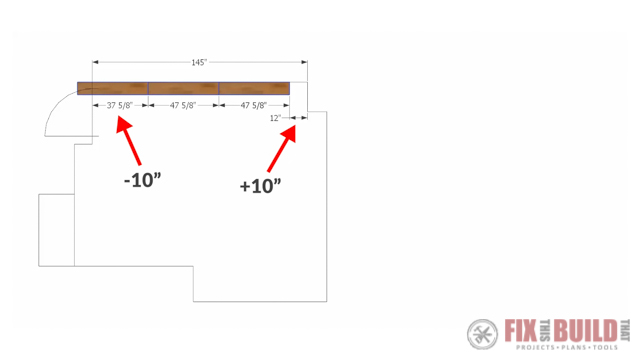
Our Example
Here’s a quick example using our room. The length of the first row is 141-½” and dividing that by our plank length of 47-⅝” shows we can fit just under 3 planks in that row.
But what if the row was 145”? Then we’d be left with a tiny piece at the end.
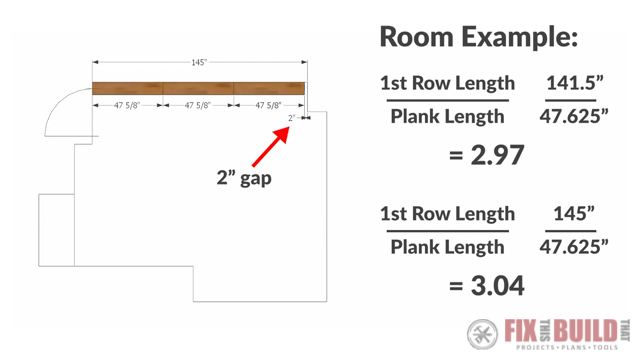
And to fix that we’d cut the first plank shorter. So cutting 10” off the first plank would give 10” to the last one. Make sense?
 How to Adjust Board Lengths
Step One: Measure the length of your room for the first row, which in our case was 141-½”.
Step Two: Divide the length of your room by the length of a single plank, ours is 47.64”. This gives the number of full and partial planks that will fit in the row, 2.97 for us.
Step Three: Multiply your remainder by your full plank length. In our case we multiplied .97 by our full plank length of 47.64”. This showed us we’d have over a 46” final piece, which is great.
Step Four: But if that had been 3.07 vs. 2.97 then our final piece would be under 3-½”. To fix that we’d cut at least 4-½” off the first plank, which would add 4-½” to the last plank getting us to 8”.
If you need to see these adjustments in action, make sure to watch the video for this project. I go over it all there as well.
We vacuumed the floor to remove any dust and debris and started laying the first row. The boards snap and lock together and with a few strikes of a rubber mallet the joint is locked.
And the third board in the row needed to be cut like we calculated earlier. Instead of measuring for the cut it’s easier to flip the board around and push the end against a spacer on the wall. Then you can mark right where the cut should be. Just remember to flip the board before doing this so you don’t cut off the wrong end.
Mistake #6 Thinking you need a lot of fancy tools
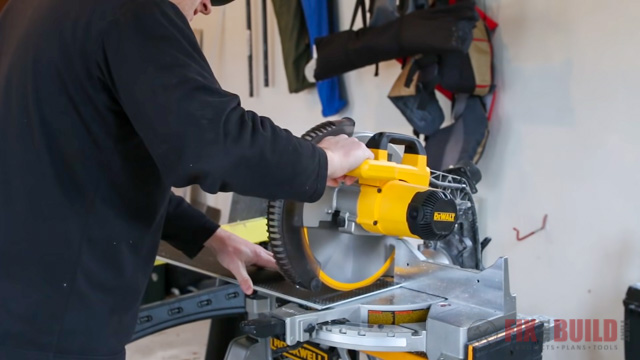
I used my brother-in-law’s miter saw for all the straight full width cuts. You might be thinking “but I don’t have a fancy miter saw” I can’t do this. Well that’s mistake #6. The beauty of vinyl flooring is that it can be cut with a wide variety of inexpensive tools.
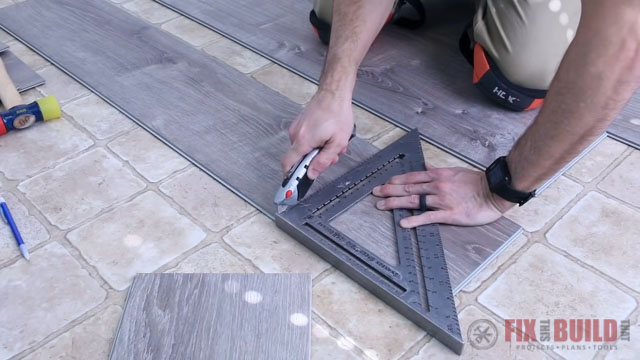
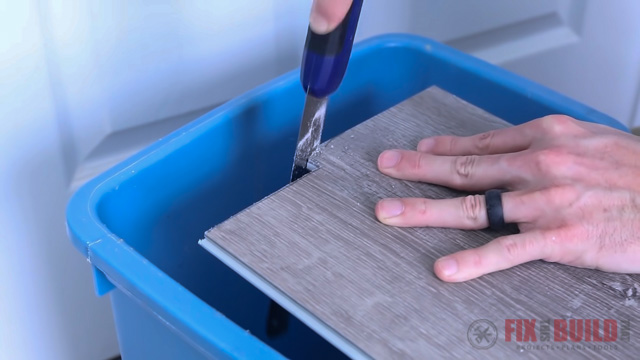
In my video on installing vinyl plank in my laundry room I showed how planks can be cut to size by scoring with a utility knife and snapping them along the line.
Undercutting door trim can be done with a handsaw.
And the same or similar handsaws can be used to cut the vinyl as well. So don’t let the lack of fancy tools be a reason to hold you back.
Mistake #7: Not Planning for Corners
One mistake I made without even realizing it was not planning for corners. I laid a few rows of vinyl plank flooring down using a soft mallet and tapping block as I went. But then I got to a bump out in the room which forms a corner, and my board wasn’t long enough to easily span the space.
The good news is vinyl plank flooring is really easy to adjust. We just separated the rows intact until we got to the row with the far corner. Then I installed a smaller plank at the front of the row. This pushed the rest of the row down and left us with nearly a full length piece.
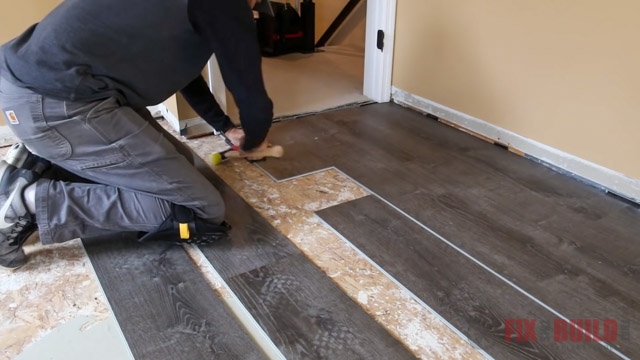
After cutting it to length we could layout for the notched corner and my brother-in-law cut it out with the jigsaw. As he installs the piece you can see how that small off cut is now supported by the full length of the board. This is much better than a small floating piece tied in to the end.
We laid down a couple more rows using the offcuts at the end of one row to start the next one. And through this whole install we did our best to avoid Mistake #8.
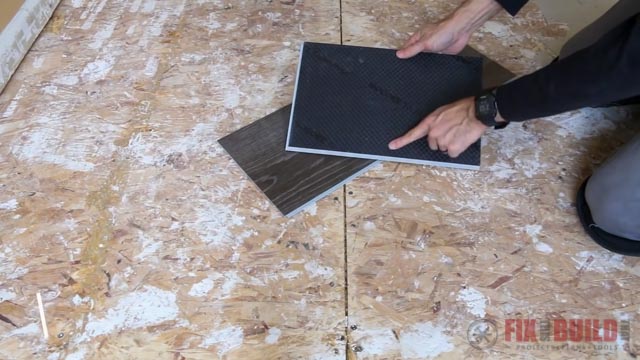
Mistake #8: Laying similar patterns next to each other
The best way to avoid this mistake involves a little prep work. Instead of taking your vinyl plank flooring straight out of the boxes, we unpacked the flooring in a space near the bedroom. We stacked the boards into eight different piles, one for each different pattern.
And as we installed the floor we kept rotating through the different stacks to try and keep similar patterns at least one board apart. Keeping this in mind will help you avoid a potential eye-sore later.
We worked our way across the room until we hit the closet door. This was fairly easy to work around. We just measured where the bump out was, cut a u-notch in a plank and slid it in place. Want more details on how to cut your flooring? I go through how to make all the cuts you’ll need in 6 Ways to Cut Vinyl Plank Flooring.
Mistake #9: Putting Air Vents Across a Seam
As we got to the far wall we ran into an air vent in the floor and mistake #9. This vent fell right in the middle of the width of our board. If it overlapped a long edge we couldn’t really help that. But what we can do is adjust where it hits along the length.
So we cut and installed a plank before the vent that would give us about 8” before the cut out.
We used a carpenter’s square and right angle to transfer the location of the vent onto the plank. Keeping the cut out away from the short edge keeps the integrity of the locking system intact and also looks better in my opinion.
We made the cutout using the multitool again. But this could also be done by drilling a starter hole and using a jigsaw or pull saw.
The vent fit right in place, and Jason replaced it after I left with a nice nickel finished cover.
Mistake #10: Not Following Manufacturer Recommendations
The biggest question I got when we installed vinyl plank flooring in the past was “why didn’t you put down underlayment”? Well that’s mistake #10.
The vinyl plank flooring I’m using has the underlayment built onto the back and doesn’t require an extra barrier. It actually voids the warranty if you use one. So follow your manufacturer’s recommendations and do what they say.
And there you have it, all 10 Mistakes to Avoid Installing Vinyl Plank Flooring! Are you about to install vinyl plank flooring in your home? Hopefully these tips will help make your job easier. Before you start your project be sure to check out How to Install Vinyl Plank Flooring for more information.


