
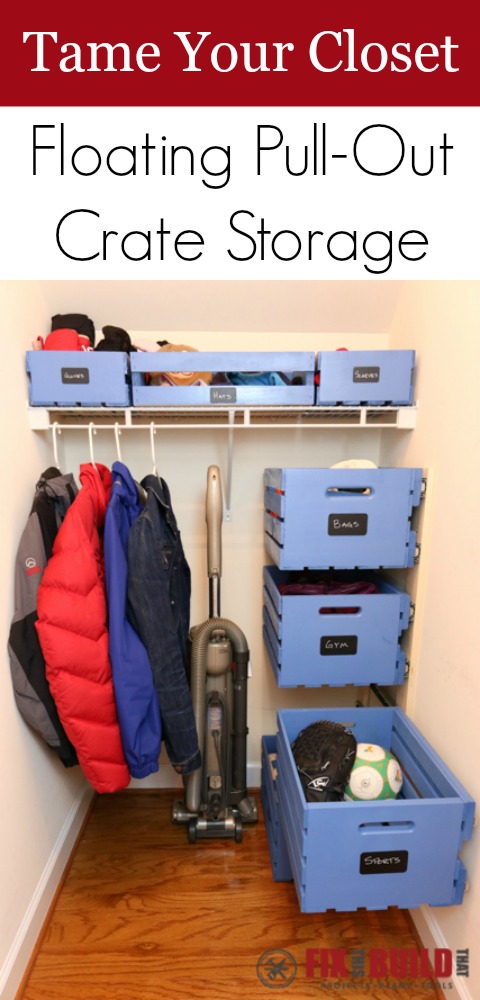
You’ve got that closet, right? The one that is weirdly shaped, super small, or just a pain to keep organized. We have one of those storage closets right off our kitchen under the stairs. It’s narrow, deep, and has a sloped ceiling in the back…and it had turned into a huge dumping ground. I needed a closet storage solution that would take advantage of the depth, give us some hanging space, and keep the small stuff organized. When CratesandPallet.com asked me to come up with a storage ides, the lightbulb went off in my head…Floating Wood Crate Storage!
First we had to clear the clutter! We did a massive clean out of all the junk that shouldn’t be in there. A bazzilion reusable grocery bags…gone. Mismatched gloves…gone. Small army of dust bunnies…gone. Then we were ready to organize! I used a combination of small and half crates on the existing wire shelves to store the little things. Then I mounted large pallet crates to the wall using full extension drawer slides so they have a small footprint but are easily accessible. Boom, floating crate storage!
Check out the full video below and please subscribe to my YouTube channel!
Materials/Supplies
- (3) 18″ Full Extension Drawer Slides
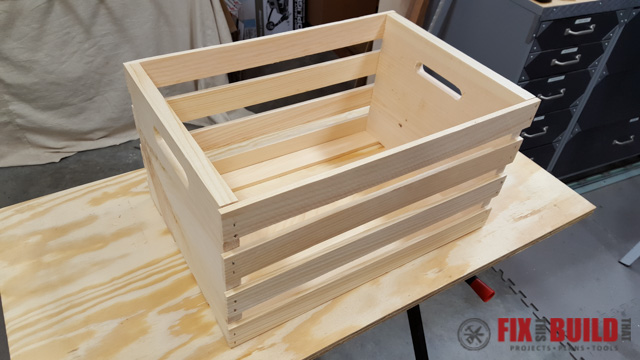
- (4) Large Wood Crates
- (1) Half Wood Crate
- (2) Small Wood Crates
- (2) 8′ 1×4 pine furring strips
- Chalkboard Stickers
- 1-5/8 Wood Screws
- Wall Anchors
Affiliate links are used on this page. See my disclosure page for info on affiliate programs.
Okay, consider this fair warning…I did this build in a closet. So some of the pics aren’t the best because I just couldn’t get good lighting and work at the same time. But you’ll get the picture…if you know what I mean 🙂
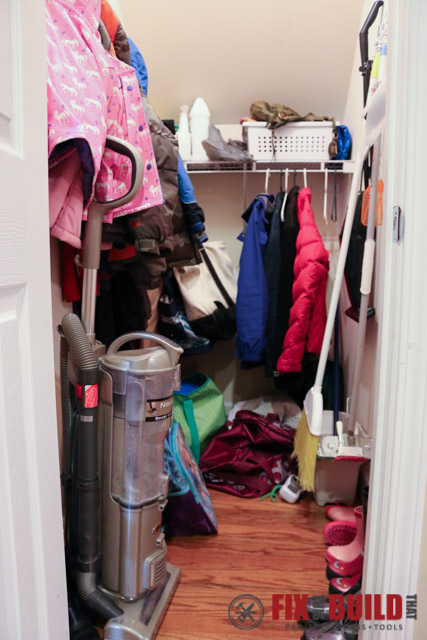
This is what the closet looked like beforehand. Yikes! We had way too much junk piled in the closet, so the first thing to do was to take it all out and start fresh. After we did this we decided that we really only needed half the hanging space in the back of the closet.
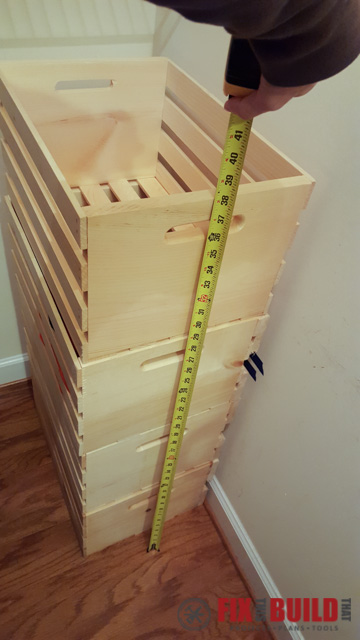
This was perfect because now we had a great spot for the large crates. I stacked them up and figured out the space would allow for 4 large crates to be used under the wire shelf.
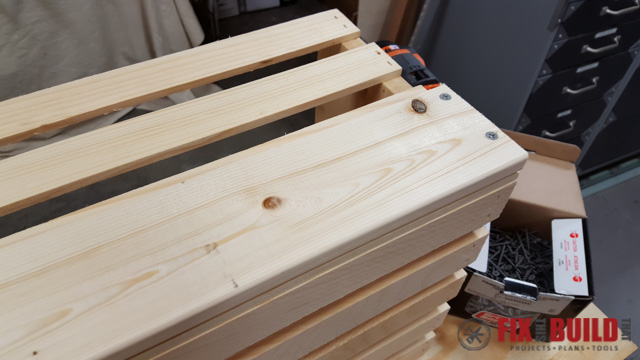
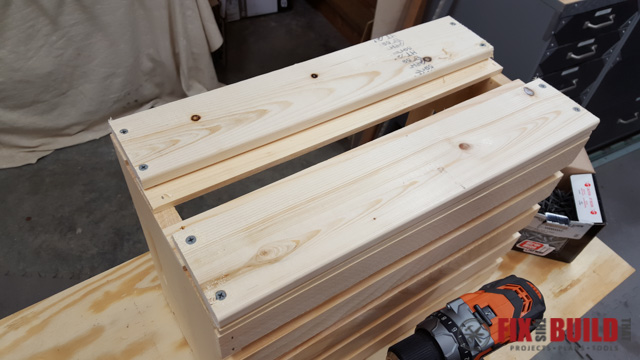
To prepare the large crates for mounting I reinforced the sides with 2 sections of 1×4 furring strip. This gave me something substantial to mount the drawer slides to the crate. I cut 2 18″ pieces for each crate on my miter saw. The Mobile Miter Saw Station I built really comes in handy!

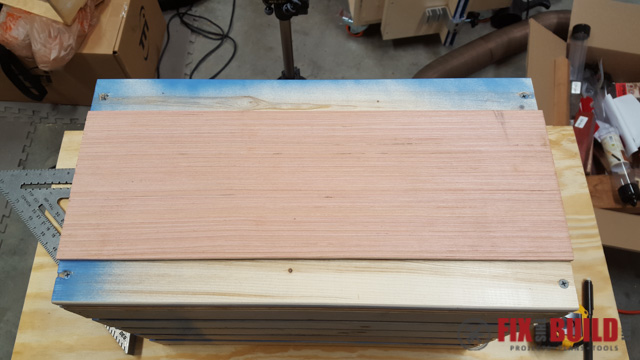
I laid out the 1×4 strips on the large crate and used 1-5/8″ screws to attach them flush with the top and bottom of the right side of the crate. I repeated this for all 4 crates.
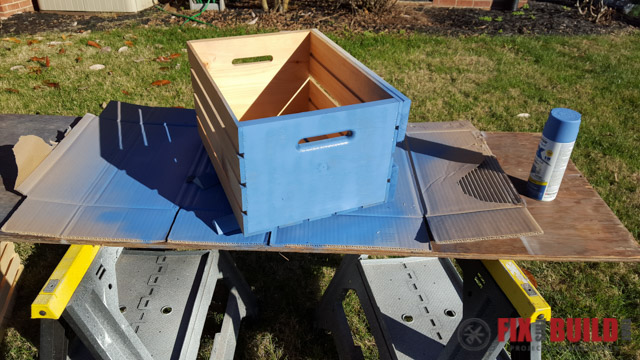
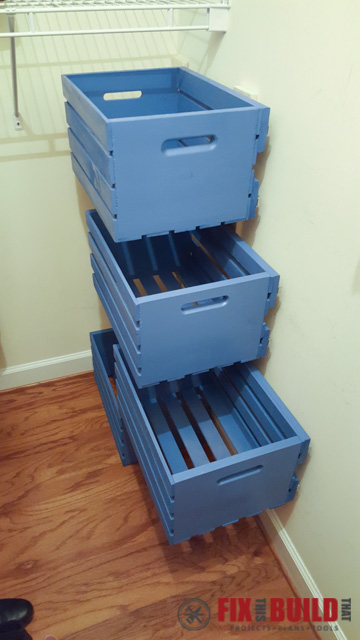
At this point I took all the crates outside to spray paint them. Before spray painting I sanded all the edges smooth with 150 grit sandpaper. I gave them 2 coats of blue spray paint except on the right side which would be against the wall.
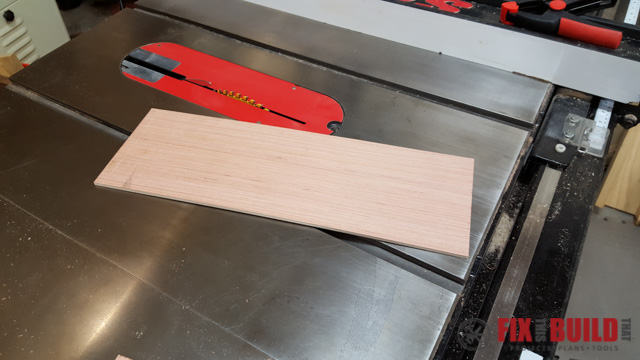
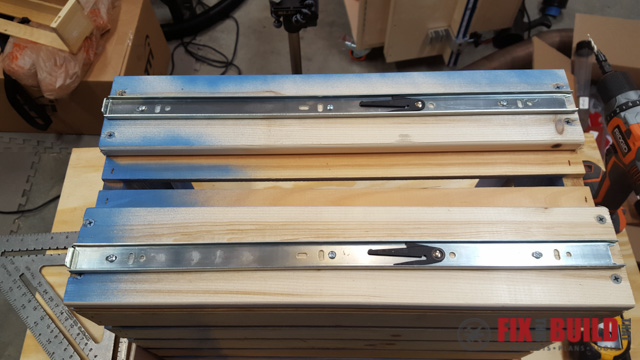
While they were drying, I cut a spacer board to help with the drawer slide install. The spacer board was 1/4″ plywood that I cut to 18″ by 6″.
Next, I used the spacer to layout the center lines for the drawer slides on each crate. This helped me make sure the slides were equally spaced and parallel. I centered the spacer 1-1/2″ from the top of the crate and drew a line on each furring strip.
Then I disassembled the drawer slides into their two parts. I used the extension piece for the crates. I lined them up flush with the front of the crate and centered the mounting holes on the reference lines. A few quick pilot holes and screws later, and the crates had their slides!
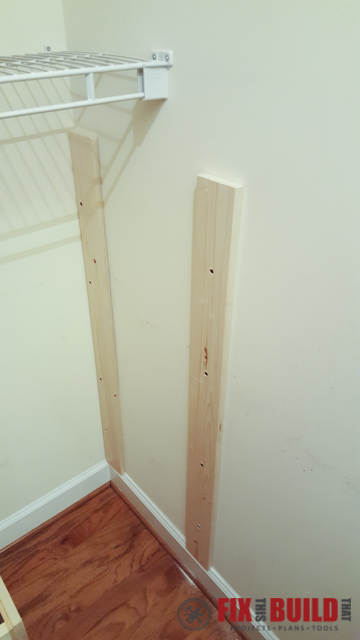
Now that the crates were ready, I went back to the closet to install the mounting strips and slides. I cut 2 more pieces of 1×4 furring strip to 39-1/2″. Then I mounted one in the back corner into the corner stud.

The next strip was placed so it ended 18-3/4″ from the back wall (the extra 3/4″ was to account for the base moulding). I couldn’t hit a stud here, so I used 4 drywall anchors to hold the strip.
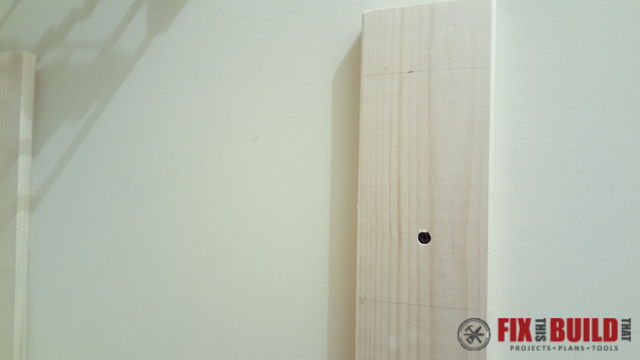
This is where that 1/4″ plywood spacer really comes in handy. I sized the furring strips to be flush with the top of the top crate and then have 3″ of spacing between each crate all the way down. So all I needed to do was measure down 1-1/2″ from the top and set the spacer flush with the front of furring strip. Then I struck lines on each side of the spacer.

Now all I had to do was align the drawer slides with the front of the furring strip and the mounting holes on the center lines like before. Attach the slides with the included screws.
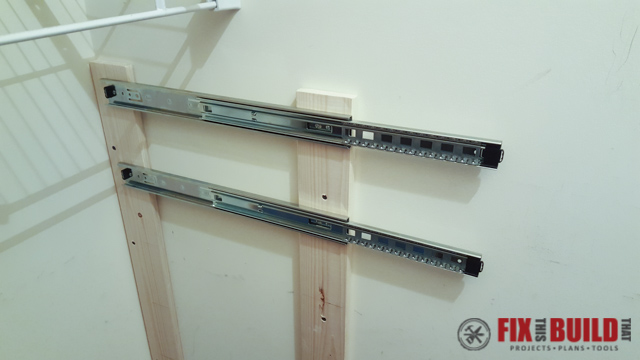
I repeated this all the way down and had all my slides mounted.
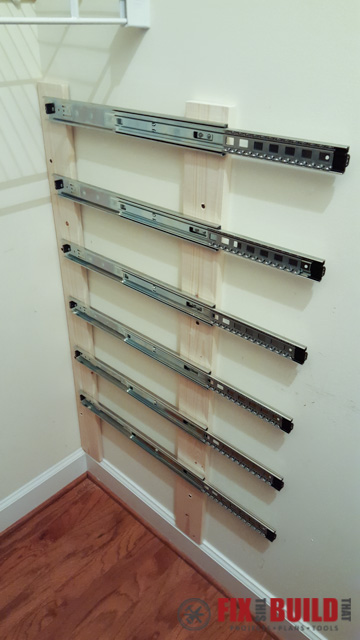
Now the only thing left to was install the crates onto the drawer slides.
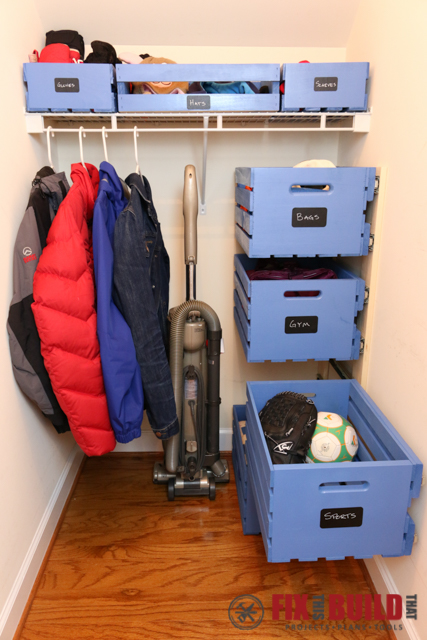
At that point we labeled all the crates with chalkboard tags and then started strategically putting things back in them. As you can see we ended up with far far less in the closet than when we started. I guess that’s what clearing the clutter is all about!
Go visit my Projects page for other great projects to build!
Crates and Pallet provided me with tools and/or monetary compensation as a sponsor of this build. All opinions are my own and are not filtered by the sponsor.


work fine for a closet that does not have an off set to each side
However lovely – wouldn’t it be easier and more economical to repurpose a 3-4 drawer file cabinet- you can pick it up on the cheap at Salvation Army – Paint – boom, done!
??? how much weight can you put in each crate being as you only have drawer slides on one side thanks !
This is great, thanks for posting it.
Thank you! I was thinking of doing this in my kitchen base cabinets by using the slides on the bottom of the containers (I can’t believe how much Rev-A-Shelf type stuff costs!) I was hesitant but this post just made it clear to me that my idea will work!
It’s a good idea, it’s basically a storage cabinet with slides and drawers without the cost of the cabinet box.I think someone asked about why you didn’t just secure the slide to the drywall.. one thing that might pose an issue with that is if you have big hands, would be the style of slides and how close they are to the wall, haha i guess you could get a screw driver and flick the triggers one by one if you ever had to remove the storage boxes off the slides.
Why didn’t you install the second furring strip onto a stud for more stability and to avoid wall anchors?
I didn’t want a gap between the furring strip and the front of the slide and 5he wall anchors hold up very well.
I love this idea. Quick question, why did you mount furring strips to the wall rather than put the glide directly on the wall into the back stud and the front with the anchor and screw?
If you look at the pic, the slides aren’t all the way to the back, so I couldn’t hit the stud in the back without the furring strip. If you can do it that would work!
Great idea — though I’m a bit weary of slides on only one side of something. What’s the weird capacity of the crates (including the weight of the crate itself)? What slide hardware are you using? (Brand matters because I’ve seen a huge quality difference in slides, so that’s why I ask). Thanks!!
I’m starting this tomorrow, this is genius. I’m doing one in the laundry room the linen closet, the coat closet and my closet. Which are all small! I would start today but I have to make a couple holes in a couple of shelves. I want all the cords and cables from my media center I made, to not be seen just dangling. Thanks again for the build.
Awesome! Post a picture here when you are done with it or on social media.Have fun!
Love this idea ! I’m so passing this along to my sister ! She has a tiny closet
Think I will build a set in my closet because the shelf above the pole is overstuffed. Also I would suggest that all sides of the boxes be painted to reduce the possibility of warping due to unpainted surfaces absorbing more moisture.
IS there a reason you didn’t paint the mounting strips to match the wall? I know you don’t see them much but it would have been a nice touch.
Brad: This is somewhat unrelated, but what kind of hardware would you use for floating crate shelves?
Not sure of you exact application, but you’ll want to go into the studs if you are going for anything heavy. And I’d put anchors up high and down low in the crates for stability.
Awesome idea! But mostly, I’m drooling over your shop. Just saying.
Thanks 🙂
currently looking at this idea for pull outs in spice cupboards and the food packaging wraps .
What weight do you estimate these crates will hold? Is there any binding of the slides when loaded? What was your final cost?
The stuff we have in it is pretty light. I loaded it with a 20lb weight and it still opened and closed easily, but I could tell it was dragging. We typically have less than 10lbs in each one and I don’t forsee that being an issue long term.
I like this idea
I really, REALLY love this idea!!!