
Today I’m going to show you how to build a sturdy DIY workbench with cheap wood. You don’t need to break the bank building this bench. Made from construction-grade lumber, this workbench has a big, solid wood top. It can also be used as an assembly table or outfeed table as well.
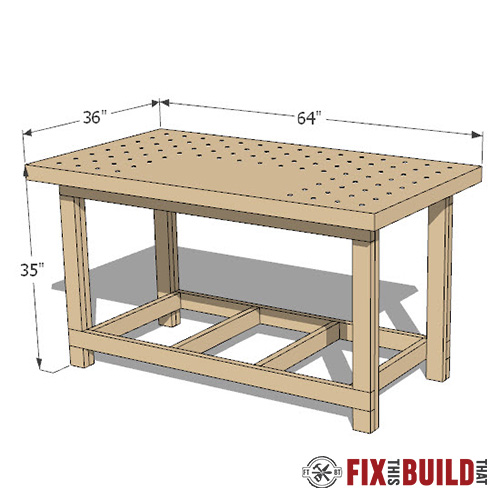
The Sturdy DIY Workbench has a 64″ x 36″ work surface, perfect for a medium sized work bench. Dog holes can be added to the workbench top for better clamping. The DIY workbench with storage is made out of solid wood with a large shelf below.
Before we get started, make sure to follow me on YouTube, Facebook and Instagram to keep up with all my latest builds!
If you are looking for more home projects, check out some of my favorites. These basic and straightforward directions will make these projects easy!
DIY Loft Bed/How to Build
DIY Sofa with Modern Styling
DIY Closet Organizer with Shelves and Drawers
Here is what you’ll need for the Sturdy DIY Workbench made with cheap wood project:
Tools Used
- Miter saw
- Table saw (or circular saw)
- Thickness planer
- Jointer
- Random Orbital Sander
- Cordless Drill
- Bar Clamps
- Pocket Hole Jig
- ¾” Auger Bit
- Router
- Chamfer bit
Materials/Supplies
- (7) 12′ 2×6 SYP boards
- (3) 8′ 2×8 SYP boards
- (2) 8′ 2×4 SYP boards
- 2-1/2” Wood screws
- 2” Pocket screws
Affiliate links are used on this page. See my disclosure page for info on affiliate programs.

How to Build a DIY Workbench
- Prep boards for workbench top
- Assemble the top
- Build work workbench base
- Attach the workbench top to the base
What kind of wood should we use for a DIY workbench?
Picking the right type of wood for your DIY Sturdy workbench comes down to your budget and how you plan to use your workbench. Hardwoods like maple, birch, and oak are a great choice because they’re strong and will last a long time. However, they’re expensive and may not fit your budget. Soft woods like pine and fir are much cheaper than hardwoods but they tend to dent and scratch.
I decided to use Southern Yellow Pine, which is a softwood, for my DIY wood workbench. This was the best choice for me because it’s affordable, strong, and available locally. Pine is a soft wood, but it holds up well for a workbench and won’t break the bank.
The sturdy DIY workbench can be built for less than $150 using seven 2x6x12s, three 2x8x8s, and two 2x4x8s (pricing as of October 2022).
Can I use 2x4s to build a DIY Workbench?
You can use pine 2x4s to build a DIY wood workbench. Using 2x4s will save you time because you won’t need to mill wood for a workbench top. 2x4s will also save you money, they’re typically a lot less money than hardwood. But I still didn’t use 2x4s to build my DIY workbench.
Why didn’t I use 2x4s to build my DIY Workbench? Simple, they look horrible (in my opinion).
Have you ever noticed that 2x4s are COVERED in small, dark knot holes? If you use 2x4s, your workbench will be too. I also didn’t want to mess with ripping the edge of each board to get a flat workbench top.
What is the best wood for a DIY workbench top?
There are a few options to pick from when building a DIY workbench top. You can go with plywood, MDF or a solid wood top. The wood you choose depends on your budget, available tools, and how you’ll use your workbench.
Plywood is a popular choice for a workbench top. The biggest advantage when using plywood is that it’s already flat. You won’t need to mill wood and laminate a top like you would for a solid wood top. However, plywood is also not as strong and sturdy as a solid wood top.
The Sturdy DIY Workbench is designed to last for years to come and will be able to take whatever you throw at it (or on it). I didn’t use a plywood top for this project because they are more likely to be dented or gouged on the surface. I also wanted a beefy top for the workbench.
Step 1: Prepping Boards for DIY Workbench Top
The top of the Sturdy DIY Workbench will be made of laminated pine boards. and will be 36 inches wide. If you choose to use pine 2x4s you can skip to Step 3.
Choose lumber for the workbench top
Having a beautiful, solid wooden top to my workbench was a priority for me. That’s why I didn’t want to mess with pine 2x4s. I knew the top of my workbench would be covered in dark black knotholes if I used 2x4s. Instead, I went to the construction-grade lumber section of my store and started hunting for larger boards.
When I picked the lumber for the workbench, I was looking for two things:
- Boards that were as straight as possible
- No knotholes or defects in the middle of the boards
I planned to get all 2x6s, but the quality just wasn’t there. After a lot of searching, I ended up with 2x12s and a few 2x10s and 2x6s.
Mill the Lumber
I cut all of the boards for the workbench top to 6 feet in length using my miter saw. Then I ran both sides of each board through my planer. Finally, I used my table saw to rip each board down the middle.
Step 2: Assemble the Top of the DIY Workbench
The workbench top will be 36 inches wide, but my planer is only 15 inches wide. I decided to divide the top into three sections so that I could still plane it. If your planer is smaller than mine, you may need to make your top in four sections.
Lay out boards for the top
Now it’s time to see what the workbench top will look like. I laid out all of the boards side by side so I could see how they would look in the end. After making a few adjustments, my workbench top was ready for the glue up.
Glue up sections of the top
Gluing up multiple six-foot-long boards is no joke, so make sure you’re prepared. I decided to put the boards right on top of a few parallel clamps. That way, I’d be ready to clamp them up when the glue-up was done. But I also used quick clamps every time I added a new board to the section.
I underestimated how long it would take to spread glue onto each board during the glue up. which was pretty stressful. Take it from me and use extended-release wood glue instead of regular wood glue. Having that extra time to get everything lined up and in the clamps makes a huge difference.
Mill the sections
Once each section of my top was dry, it was time to run them through the planer. But first, make sure you scrape off any dried glue squeeze out. You don’t want that mess junking up your planer. Also, these sections are heavy, so make sure you have an outfeed table in place for them to rest on.
Planing the section is straightforward but heavy work, so take your time. When all of the sections are the same thickness, run them through the joiner as well. After cutting them to size on the tablesaw, we were ready for the final glue up.
Clamp sections together
Clamping all three sections of the workbench top together is a big job. And it’s important to work on a flat surface. I shimmed a work table so it was the same height as my old workbench.
You can always do this step on the ground; just use the flattest area you can find. Lay the sections on the clamps and use a mallet to get them as level and even as possible.
Flatten the DIY Workbench Top
To flatten the top of your DIY Workbench, start by smoothing out any seams and high spots. You’ll do this with a hand plane, just knock them down a bit. Then, using a long level, check for any remaining high spots.
Use the hand plane to shave off material where the top needs to be lowered. Make sure to go against the grain to avoid tear-out as much as possible. After you’ve flattened the surface, smooth it out with a hand sander.
If you don’t have a hand plane, a belt sander will work, but it will create a lot of dust. You may want to do this outside, and be careful not to take off too much at a time.
Step 3: Build the base for the DIY Workbench
The base of the DIY workbench is made of four workbench legs with stretchers at the top and bottom. The stretchers add strength and stability to the workbench. They also help the legs carry the load of the workbench top.
Cut the Parts
I milled the boards to the same size as standard 2x4s before cutting the parts for my workbench. Then I used my cut list to get the precise lengths I needed. Get the cut list and detailed step-by-step plans to build your own sturdy DIY workbench!
Make the legs
Each workbench leg is made of two 2x4s, which will be glued together. One of the 2x4s will have gaps where the stretchers will rest. Every detail of how to build the workbench legs is included in the step-by-step plans.
Here’s a quick overview of how I built the legs for my workbench. I started by laying the full length 2×4 on my work surface. Then I placed a spacer at the top of that 2×4; this represents the top stretcher, which will be right underneath my workbench top.
Next, I butted the second 2×4 right up against the spacer. Then I added glue to this section and nailed it into place. After that, I placed another spacer next to the section I just attached.
This spacer represents the second stretcher near the bottom of my workbench leg. Finally, I glued and nailed the final section of 2×4 next to that spacer.
Finally, I repeated this process to build all four legs.
Cut the Stretchers
Next, I cut the stretchers to length for the top and bottom of each leg. Then I drilled holes on the underside of the top stretchers. I’ll use these holes to attach the base to the workbench top later on.
Assemble Sides
Each side of the base is made of two legs and two stretchers, one at the top and one at the bottom. For the easiest assembly, I drilled pilot holes and screwed the stretchers to the legs one section at a time. But I didn’t use glue at this point. After getting both sides assembled, I connected them together and checked for square.
Finally, I backed out the screws one board at a time, carefully glued the joint, and screwed it back into place. I repeated this process for each board until each side was complete.
Once the sides were assembled, I glued and plugged each screw hole with a dowel. Then I used my flush cut saw to trim it off.
Assemble DIY Workbench Base
With both sides built, we’re ready to connect them with support pieces. I assembled the base right on the workbench top because it’s a big, flat surface. You could also build your base on the ground or any other flat surface.
To build the base, I cut the support pieces to length and drilled pocket holes in each board. Then, I set the sides in place and joined them with the support pieces. This was fast and easy, with the pocket holes already drilled.
Using a level and some clamps, I attached the shelf support pieces as well. Then, after lowering the base to the ground, I was ready to put the finishing touches on my solid workbench top.
Step 4: Finish the DIY Workbench Top
Add Dog holes to Workbench Top
I designed the Sturdy DIY Workbench top with adding dog holes in mind. My goal was to have enough dog holes for clamping and to add them strategically.
I made sure to:
- Avoid adding dog holes over the support pieces.
- Stay away from placing dog holes over the side pieces.
- Keep an area dog hole-free so I have a flat surface for writing.
- Place the dog holes close enough to the sides for optimal clamping.
I kept it simple by using a drill press attachment
These bundle plans give you detailed instructions for all of your home projects! No better time for home builds than NOW!
Are you looking to spruce up your patio? I have plans for a fun Outdoor Seating Bundle that includes a sofa and chair. Click HERE for all the details.
Looking for a shed to store all of your summer fun items? I have a Modern 10 x 12 DIY Shed Plan that is amazing. Click HERE for the plans.
Do you need more storage in the kids’ bedrooms? Check out how to build a Daybed with storage drawers. I have plans for that, too! Click HERE!


