This post is sponsored by The Home Depot.
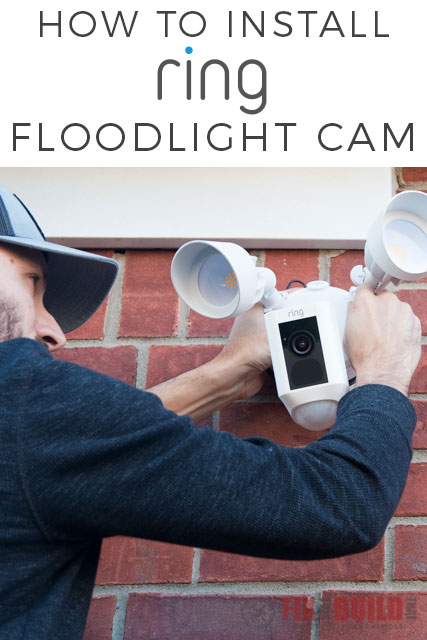
Hey guys, today I’m going to show you how to upgrade your home security with the Ring Floodlight Cam. This is the latest installment of my Smart Home series with The Home Depot.
A few months ago I installed the Ring Spotlight Camera on my back porch and it’s worked like a charm. I decided that it would be great to have that same level of security on the front of our house, because some cars in our neighborhood have been broken into lately. We park our vehicles on our driveway, so installing a motion activated floodlight with video surveillance was a no-brainer.
Tools Used
Materials/Supplies
Affiliate links are used on this page. See my disclosure page for info on affiliate programs.
How To Install a Ring Floodlight Cam
- Option 1: Replace Old Floodlight with Ring Floodlight Cam
- Option 2: Install a Junction Box for Ring Floodlight Cam
- Attach Mounting Bracket and Connect Wires
- Install the Ring Floodlight Cam
- Download Ring App to Access Features
Installing the Ring Floodlight Cam is really easy. But before we get into the installation process let’s check out what you get in the box.
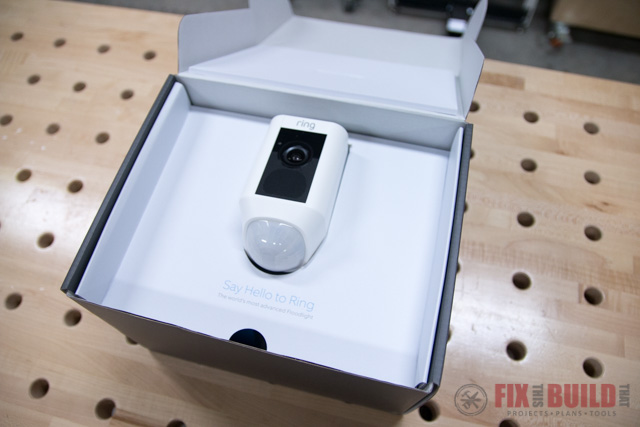
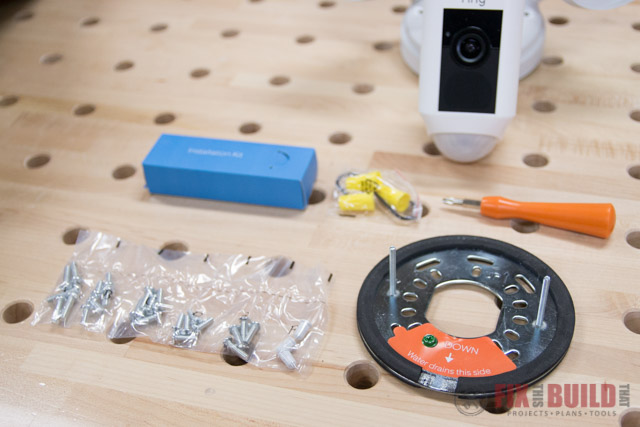
Included in the box is the Ring Floodlight Cam, screwdriver with a phillips bit, mounting bracket, bag of mounting bolts, 3 wire nuts, 3 screw cap nuts, and a hook.
Option 1: Replace Old Floodlight with Ring Floodlight Cam
Before we go any further, make sure you turn off the power at the breaker box. And if at any point you feel like you need help, call a licensed electrician.
The easiest way to install the unit is to take out an existing floodlight and replace it with the Ring Floodlight Cam. I have floodlights above my garage but they work on a switch along with another set of floodlights on the other side of my house. If you replace your old floodlights with the Ring Floodlight Cam, you have to keep the switch turned on for the camera to work. This wouldn’t be a problem if you only have one floodlight connected to your switch, and they even include stickers to put by the light switch to remember to keep it turned on. But in my case, I would have to have the second set of floodlights turned on all of the time, so I decided to run the unit on a separate electrical box.
Option 2: Install a Junction Box for Ring Floodlight Cam
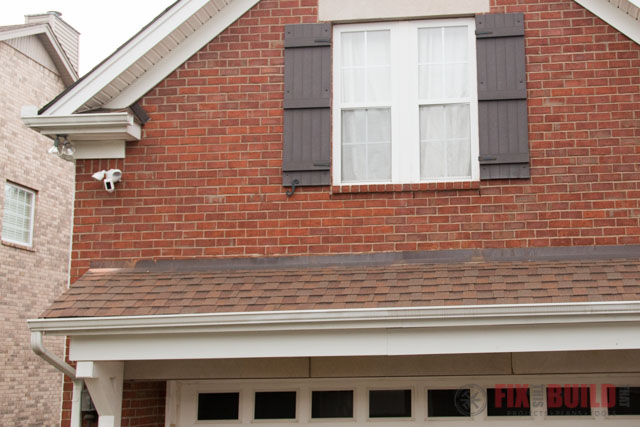
Since I decided to install my own junction box, I had to decide where it should go. The folks at Ring recommend that you mount the Ring Floodlight Cam 9 feet off the ground. At this height it can detect human sized objects up to 30 feet away. Unfortunately I have a small, narrow roof right above my garage at the 9 foot mark, so I had to mount the camera a bit higher to be able to scan the area and not have the roof block the camera’s view. Check out this after picture to see what I’m talking about.
Once I decided where I wanted the Ring Floodlight Cam, I drilled a hole with a masonry bit through the mortar at that spot. Then I was able to pull wire from an electrical box that was near this location on the inside of the wall.
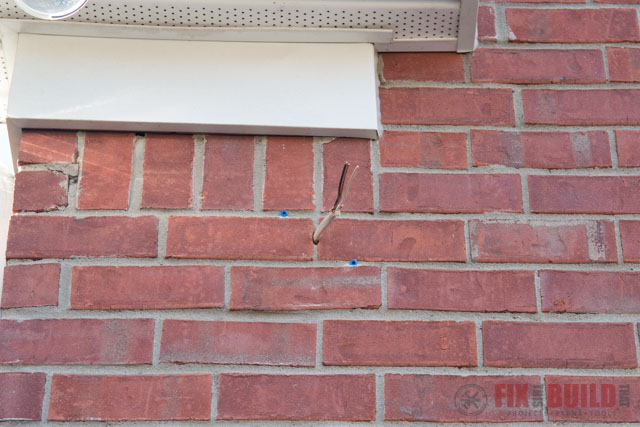
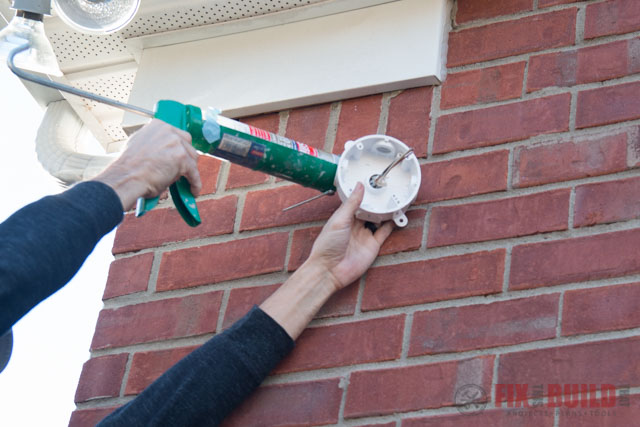
At this point I mounted the junction box to the wall and made sure to seal the hole with silicone caulk.
Attach Mounting Bracket and Connect Wires for Ring Floodlight Cam
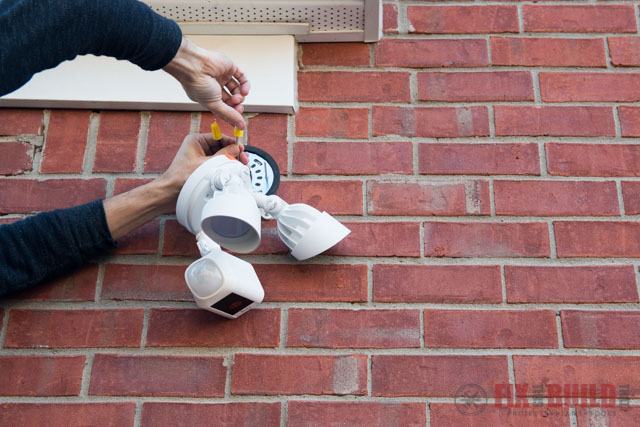
From this point on the installation process is the same as it would be if you were replacing an existing fixture. Next I installed the mounting bracket to the junction box, making sure to keep the two posts level to the ground.
Using the hook from the kit, I hung the Ring Floodlight Cam from the bracket while I connected the wires. There are three wires to connect; a copper wire (a ground), a white wire (a neutral wire) and the black wire (the hot wire). Follow the specific instructions when hooking up these wires, it’s very straight forward.
Install the Ring Floodlight Cam
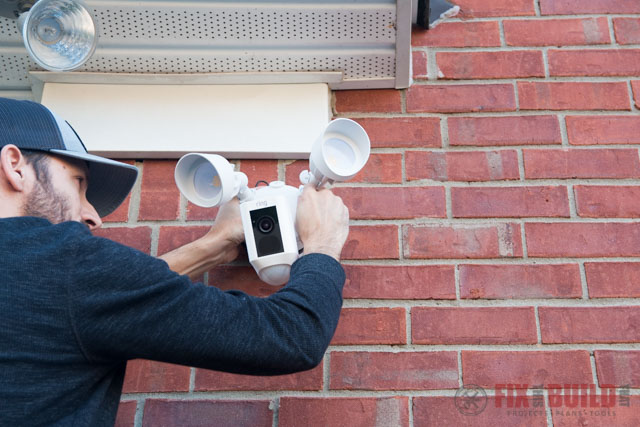
Once I had my Ring Floodlight Cam wired up I was ready to mount the camera. I lined up the mounting posts with the holes in the Ring Floodlight Cam and used the orange screwdriver to secure it with the screw cap nuts.
At this point I turned the electricity back on and the floodlight cam fired up!
Download Ring App to Access Features
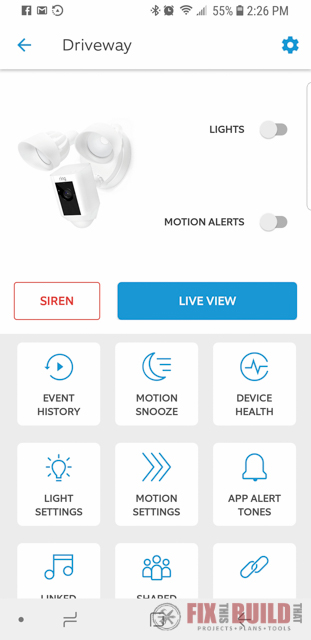
If you don’t have the Ring app you’ll need to download it and select the Floodlight Cam. As you can see, I have two other Ring cameras and they all come up at the top of the screen. You can see how recent activity is listed out in chronological order in this screen.

Once I selected the Floodlight Cam, I was able to adjust the settings for my camera. You can see in the picture all of the cool settings you can get into at this point. I really like that there is a siren I can set off if I ever needed to, hopefully that won’t happen though. I also really like that I can snooze the motion, and turn the lights off and on as needed.
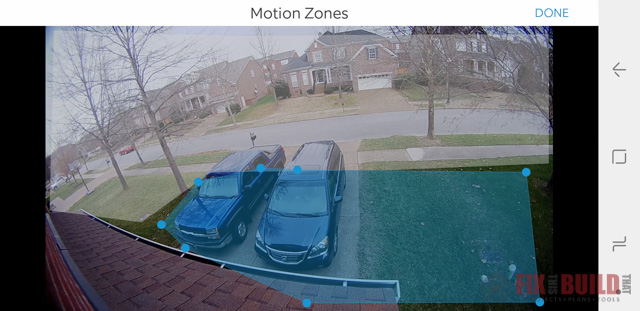
It’s really easy to adjust the motion zones with the Ring app. I didn’t want the lights going off when people are just walking on our sidewalk at night, so I was able to make that adjustment really quickly on the Ring app.
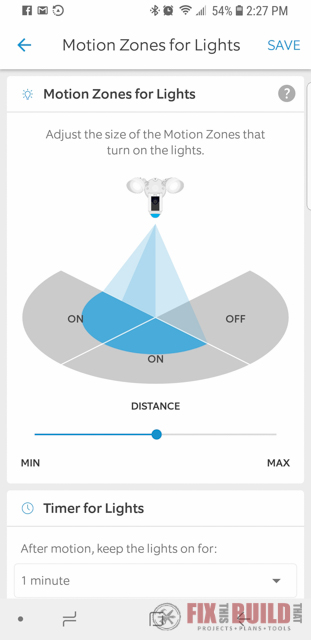
You can see how I adjusted our motion zone so that it didn’t include the sidewalk or the street. I really just want to know if someone comes in our yard or on our driveway so this was perfect.
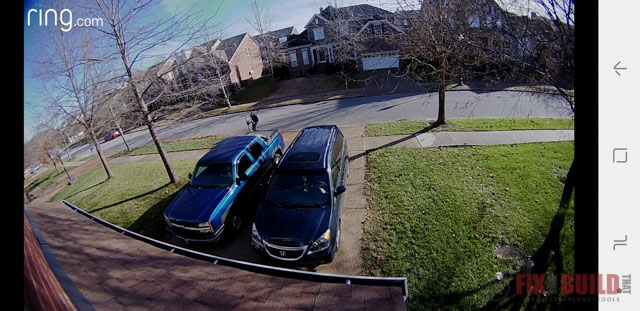
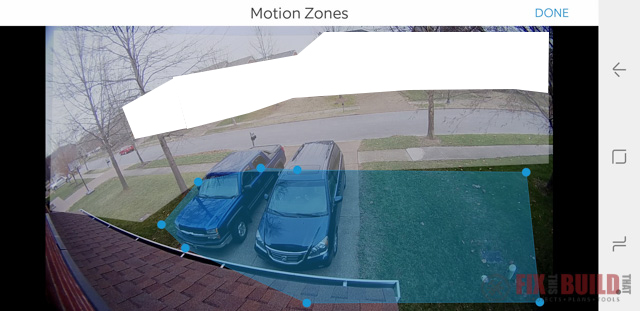 I’m really impressed with the picture quality with the Ring Floodlight Cam. It’s clear and crisp during the day.
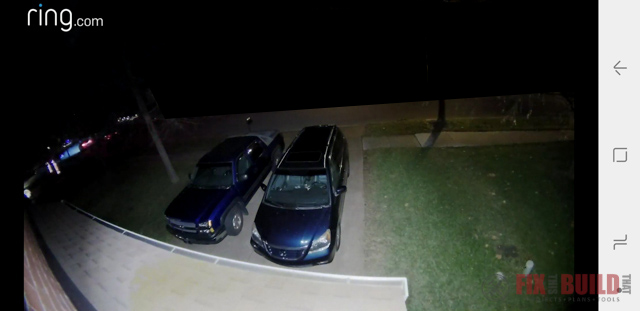
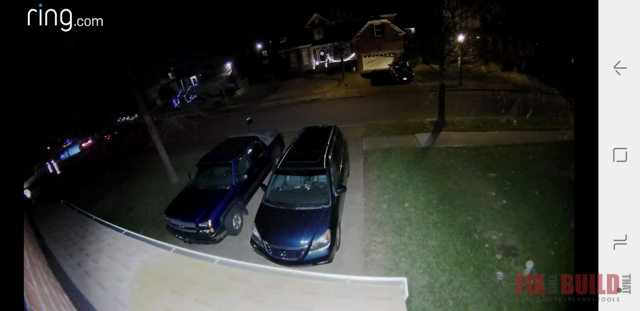
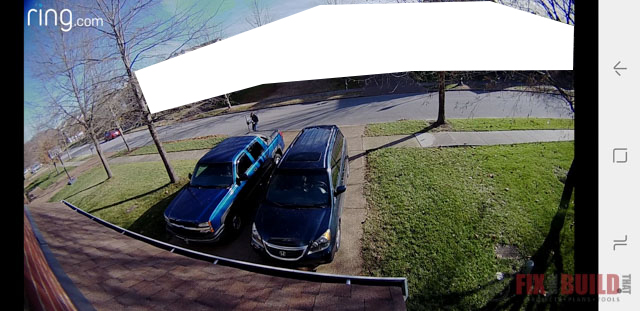 And as you can see, when the floodlights come on at night I have a great view of our driveway.
 Installing the Ring Floodlight Cam was quick and easy. If you’re looking for a way to add security to your home, this is a great option!
To check out more of my Smart Home Series with The Home Depot, head on over to my Home DIY Page.
How To Install a Ring Floodlight Cam
- Option 1: Replace Old Floodlight with Ring Floodlight Cam
- Option 2: Install a Junction Box for Ring Floodlight Cam
- Attach Mounting Bracket and Connect Wires
- Install the Ring Floodlight Cam
- Download Ring App to Access Features
Installing the Ring Floodlight Cam is really easy. But before we get into the installation process let’s check out what you get in the box.
Included in the box is the Ring Floodlight Cam, screwdriver with a phillips bit, mounting bracket, bag of screws, 3 wire nuts, 3 screw cap nuts, and a hook.
Option 1: Replace Old Floodlight with Ring Floodlight Cam
Before we go any further, make sure you turn off the power at the breaker box. And if at any point you feel like you need help, call a licensed electrician.
The easiest way to install the unit is to take out an existing flood light and replace it with the Ring Floodlight Cam. I have floodlights above my garage but they work on a switch along with another set of floodlights on the other side of my house. If you replace your old floodlights with the Ring Floodlight Cam, you have to keep the switch turned on for the camera to work. This wouldn’t be a problem if you only have one floodlight connected to your switch, and they even include stickers to put by the light switch to remember to keep it turned on. But in my case, I would have to have the second set of floodlights turned on all of the time, so I decided to run the unit on a separate electrical box.
Option 2: Install a Junction Box for Ring Floodlight Cam
Since I decided to install my own junction box, I had to decide where it should go. The folks at Ring recommend that you mount the Ring Floodlight Cam 9 feet off the ground. At this height it can detect human sized objects up to 30 feet away. Unfortunately I have a small, narrow roof right above my garage at the 9 foot mark, so I had to mount the camera a bit higher to be able to scan the area and not have the roof block the camera’s view. Check out this after picture to see what I’m talking about.
Once I decided where I wanted the Ring Floodlight Cam, I drilled a hole with a masonry bit through the mortar at that spot. Then I was able to pull wire from an electrical box that was near this location on the inside of the wall.
At this point I mounted the junction box to the wall and made sure to seal the hole with silicone caulk.
Attach Mounting Bracket and Connect Wires for Ring Floodlight Cam
From this point on the installation process is the same as it would be if you were replacing an existing fixture. Next I installed the mounting bracket to the junction box, making sure to keep the two posts level to the ground.
Using the hook from the kit, I hung the Ring Floodlight Cam from the bracket while I connected the wires. There are three wires to connect; a copper wire (a ground), a white wire (a neutral wire) and the black wire (the hot wire). Follow the specific instructions when hooking up these wires, it’s very straight forward.
Install the Ring Floodlight Cam
Once I had my Ring Floodlight Cam wired up I was ready to mount the camera. I lined up the mounting posts with the holes in the Ring Floodlight Cam and used the orange screwdriver to secure it with the screw cap nuts.
At this point I turned the electricity back on and the floodlight cam fired up!
Download Ring App to Access Features
If you don’t have the Ring app you’ll need to download it and select the Floodlight Cam. As you can see, I have two other Ring cameras and they all come up at the top of the screen. You can see how recent activity is listed out in chronological order in this screen.
Once I selected the Floodlight Cam, I was able to adjust the settings for my camera. I like that there is a siren I can set off if I ever needed to. I also really like that I can snooze the motion, and turn the lights off and on as needed.
It’s really easy to adjust the motion zones with the Ring app. I didn’t want the lights going off when people are just walking on our sidewalk at night. I was able to make that adjustment really quickly on the Ring app.
You can see how I adjusted our motion zone so that it didn’t include the sidewalk or the street. I just want to know if someone comes in our yard or on our sidewalk so this was perfect.
I’m really impressed with the picture quality with the Ring Floodlight Cam. It’s clear and crisp during the day.
And as you can see, when the floodlights come on at night I have a great view of our driveway.
Installing the Ring Floodlight Cam was quick and easy. If you’re looking for a way to add security to your home, this is a great option!
To check out more of my Smart Home Series with The Home Depot, head on over to my Home DIY Page.
I acknowledge that The Home Depot is partnering with me to participate in this Smart Home Program (the “Program”). As a part of the Program, I am receiving compensation in the form of products and services, for the purpose of promoting The Home Depot. All expressed opinions and experiences are my own words. My post complies with the Word Of Mouth Marketing Association (WOMMA) Ethics Code and applicable Federal Trade Commission guidelines.


Hello how did you get the junction box in the wall?
It’s mounted on the exterior surface (on the brick).