
DIY Storage Cabinets with 11 Drawers: Full Guide

DIY Storage Cabinets for Home Office

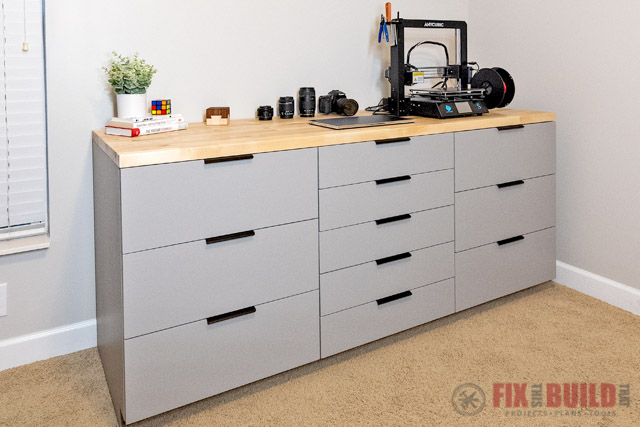
Looking to add DIY storage cabinets to your home office?  My office was a mess… until I built my 11 drawer storage cabinet.  With a drawer for everything I need to store, my office is looking better than ever.  Reclaim your home office by build your own storage cabinet today!

Before we get started, make sure to follow me on YouTube, Facebook and Instagram to keep up with all my latest builds!

Here is what you’ll need for the project:

Materials/Supplies

Affiliate links are used on this page.  See my disclosure page for info on affiliate programs.

diy storage cabinets build plansClick Here For Plans

Planning and Cutting the DIY Cabinet Pieces

First, I broke down my plywood sheets using my track saw, but you can also use a circular saw with a straight edge for square cuts. This DIY plywood cabinet is designed to be six feet wide, so precision is key when cutting the panels to their final dimensions.

man cutting plywood with track saw on the ground

Moving those big plywood sheets around can be a pain, so I use a plywood handler to make it easier. Simple tools like that really help. I also mark the pieces as I cut them to stay organized. All the cut details are in the plans.

Finally, I incorporated an integrated toe kick into the design, which I cut out using a jigsaw. Be sure to use a chisel for fine adjustments instead of trying to shave off small bits with the jigsaw—it’s a lesson I learned the hard way!

a man is cutting out a small square in a sheet of plywood to make a toekick.

Assembling the DIY Cabinet Base

The main structure of the DIY storage cabinets, came together with the help of pocket holes and stretchers. I used spacers to ensure accurate positioning of the center supports and dividers, which will help carry the load of the drawers. 

Next I screwed the bottom panel into the base of the cabinet, and then I attached the center support panels in the cabinet.  Make sure you take the measurements for these panels after you finish building the carcass.  Remember to take the measurement at the side of the opening, not in the middle where the stretcher may flex or bow.

using measuring tape to measure opening in cabinet

For added rigidity and easier wall mounting, I installed cleats on the back of the cabinet. These make it simple to secure the unit to studs, preventing any tipping hazards when the drawers are fully extended.

Adding Edge Banding to Cabinet Drawers

Before I paint the DIY storage cabinets, I wanted to cover the edges of the plywood for a more finished look.  To do this, I applied hardwood edge banding, which not only improves durability, but also makes painting easier. If you don’t have an air nailer, painter’s tape works great for securing the banding while the glue dries.  Then, I filled in any seams with putty and sanded everything down.

attaching solid edge banding to cabinet

Painting the DIY Storage Cabinets

I started painting by using a sprayer to give the cabinet base outside a smooth coat of paint.  Then I cut the drawer fronts to size. Once that was done, I was ready to sand them down, prime, and paint them.

spraying cabinet drawer fronts with paint

While the drawer fronts dried, I gathered up all of the boards that will become my drawers, and added edge banding.  I used iron-on edge banding and literally just ironed it on to the edges of my drawers.  Once it cooled down I used a flush cut trimmer to trim the edges off and a double-sided edge banding trimmer to get the sides looking perfect.

using a double edge trimmer to trim egde banding

Building and Installing the Drawers

I assembled each drawer box using pocket screws and then cut 1/4″ panels down for the drawer bottoms.  Once the panels were cut to size, I glued them down and attached them with brad nails for a strong drawer.  

clamping boards together to make a drawer

To install the drawer slides, I used pre-cut spacers to ensure consistent spacing. Once the slides were in place, mounting the drawers was straightforward. A simple scrap wood jig helped me align the drawer fronts perfectly.  

attaching drawer slides to cabinet with spacers

The Final Touch: A Butcher Block Countertop

For the top, I opted for a ready-made butcher block countertop. It required minimal trimming and added a beautiful, functional surface to the cabinet. After securing the top and attaching the cabinet to the wall, my office was transformed into a more organized and inspiring workspace.

putting finish on the butcher block counter top

Make Your Own 11-Drawer DIY Storage Cabinets

This custom office storage cabinet was the perfect solution for taming the mess in my home office. With plenty of room for tools, supplies, and even my 3D printer, it’s both practical and stylish. If you want to build your own, I’ve got detailed plans available— download your own DIY Storage Cabinets.

Looking for more DIY storage solutions for home offices? Check out my DIY Desk with Drawers or my Built-in Shelves with a Desk.

Until next time, get out there and build something awesome!