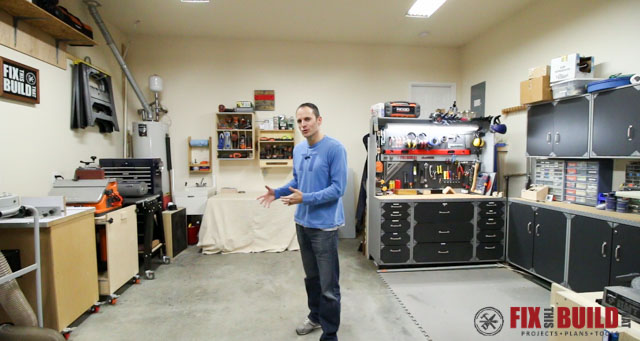
Hey, guys! Today I’m giving you a little behind the scenes view of the Fix This Build That workshop…aka a tour of my garage. I’ve been in my current house for 3.5 years and during that time I’ve really gotten deeper into woodworking, launched this blog and more recently my YouTube channel. I’ve also upgraded a lot of my tools in the last 3 years and changed my workflow several times. I’ll walk you though the shop in the post and I also made a YouTube video walk through if you’d like to get a better feel for it.
First off I’d like to give a huge shoutout to Jay Bates from JaysCustomCreations.com for spurring me on to do this shop tour. Jay has a Shop Tours section on his website where he highlights shops of different woodworkers and asked me to share my shop tour. You can also find Jay on YouTube where has a huge library of awesome videos.
Affiliate links are used on this page. See my disclosure page for info on affiliate programs.
I’ll start with the basics. My shop is in a 2 car garage attached to my house. The garage is extra deep and the total space is 31′ long by 19′ wide. We don’t park in the garage, but I share the space with my kid’s bikes/scooters/big wheels, the yard tools, and some other long term home storage.
Here is a view from the far end of my shop standing just past the tablesaw. The entry door to the house is in the back right corner. Straight through the door is our downstairs bathroom, to the left is my office, and to the right is the kitchen. I really love that because I can take a bathroom break, snack break, or check a design on the computer and get back to the shop without getting distracted…most of the time.
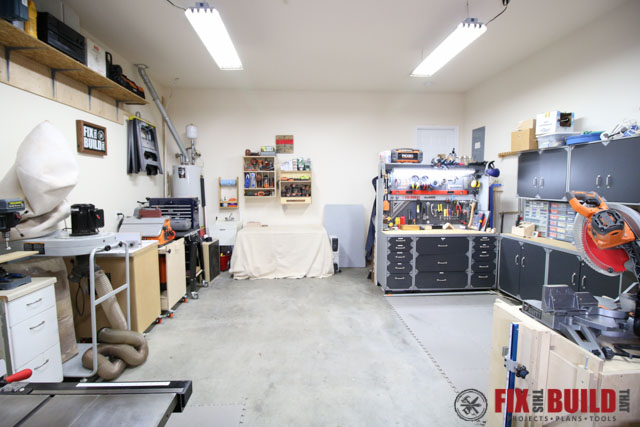
Here Is the left wall.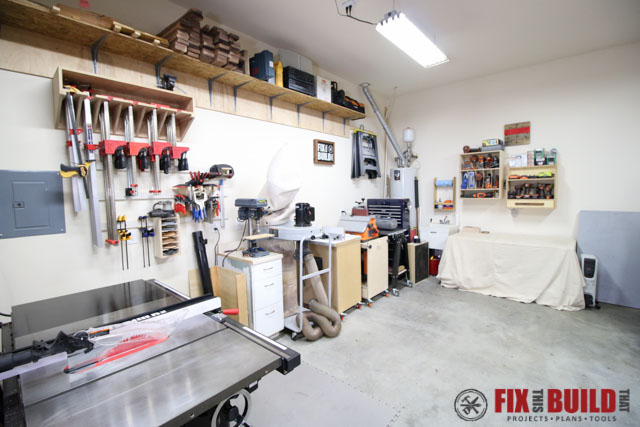
And the right wall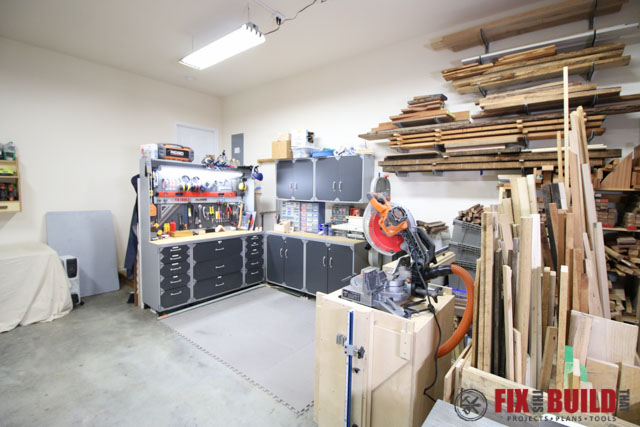
You’ll notice a couple things about my shop in these pictures. It’s very open, it’s very clean, and I have a lot of wood. I definitely cleaned up for these pics and most of the time I have things strewn about the horizontal surfaces of the shop.
It may seem like I have a lot of wasted space in the middle, but I love having it open like this. I can move the mobile tools out and have plenty of space around them and I just like the open feeling of it. Eventually when I make the dedicated assembly table and proper workbench I’ll need to use this space, but I love it right now.
I’ll start on the back wall of the shop and work my way around the rest of the shop. The back wall is mainly used for storage. I have a table covered with a painter’s cloth that I use for staging tools or parts during projects. Underneath the table are various mid/long term storage items I keep hidden. I plan to replace this table with some base cabinets with pull out drawers in the future.
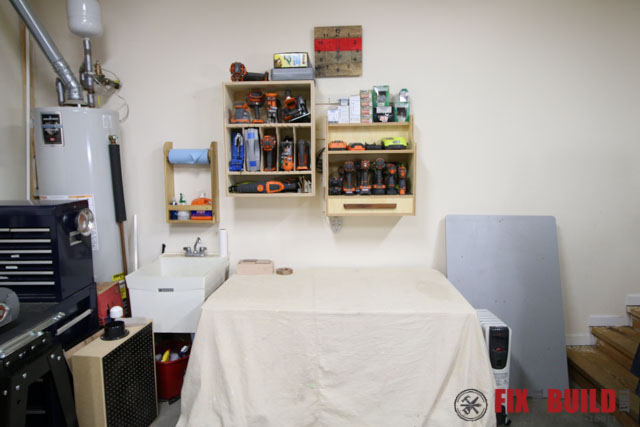
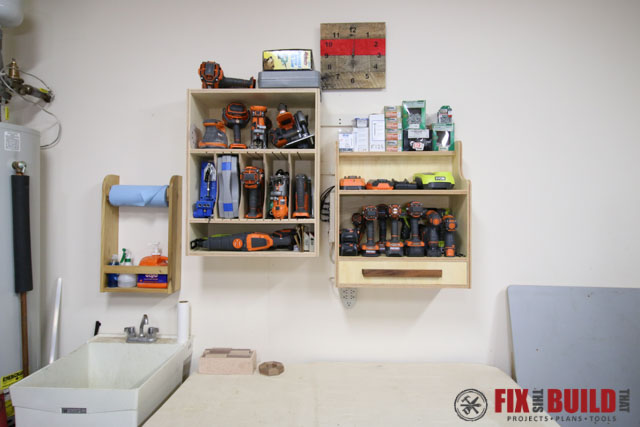
Above the table I have a French Cleat System that holds my Cordless Drill Charging Center and a Tool Storage Wall Cabinet. I have a short video walkthrough on the items on this back wall you can check out that shows the flexibility of the french cleat system. The Cordless Drill Charging Center was based on Jay Bates’ Charging Station and holds all my drills, drivers and accessories. The Tool Storage Wall Cabinet holds my other cordless power tools like my RIDGID Gen5X kit along with some trim routers, cordless nailers, and my Kreg jigs.
In the corner of the shop I have a water heater and a sink right next to it. Having a sink is a great luxury in the shop and I use it to clean up my brushes, glue, and just wash up before going inside.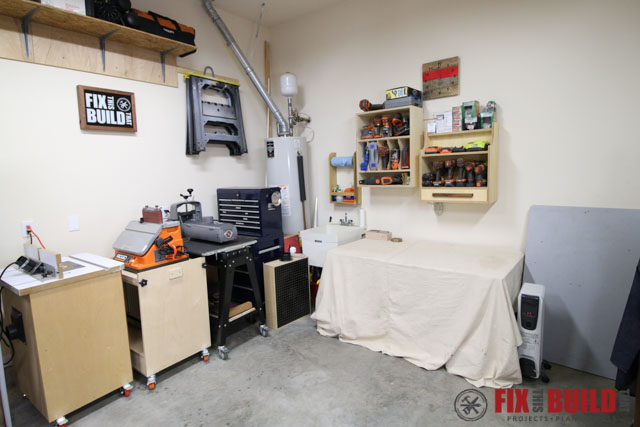
The next wall of my shop is what you typically see in my posts and videos as my backdrop.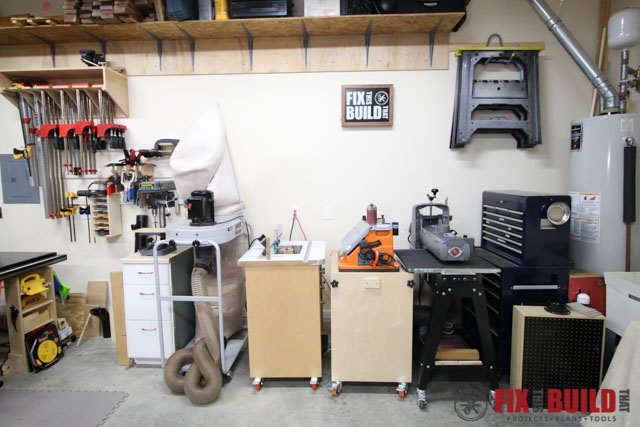
Right now I use a knockdown assembly table which is just an old melamine sewing table top set on 2×4’s on a couple sawhorses. It sits in the middle of the shop but I can move it out of the way and build larger projects like my Modern Outdoor Sofa I recently made. It’s very portable and flexible but extremely lacking in features and storage. I plan to make a dedicated assembly table based on the Paulk Workbench soon and pack it with storage options for everything I need when doing assemblies.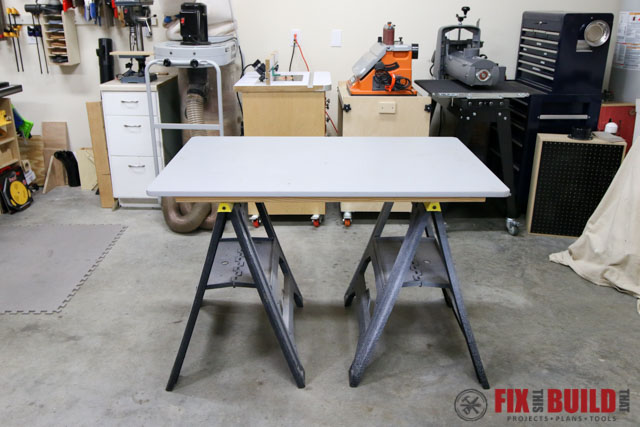
On the long wall of the shop it starts with a rolling tool cabinet with sockets, wrenches, pneumatic tools, and various sized screwdrivers in it. After that I have several of my tools on mobile bases. I have a SuperMax 19-38 drum sander which I upgraded to from a Performax 16-32. I have a blog post where I compare the features of the two units, so check that out if you’re interested in more info on it.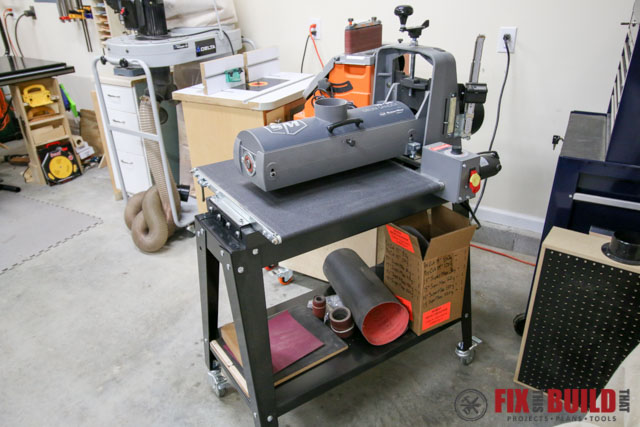
Next I have my Flip Top Tool Stand that holds my 13″ RIDGID Planer and my RIDGID Oscillating Spindle Sander. I roll the unit away from the wall and I can plane up to 6′ boards as it sits or can position it further into the shop for extra infeed/outfeed as needed. This is one of my favorite shop builds as it’s a real space saver. I have a walkthrough video for it as well as plans available.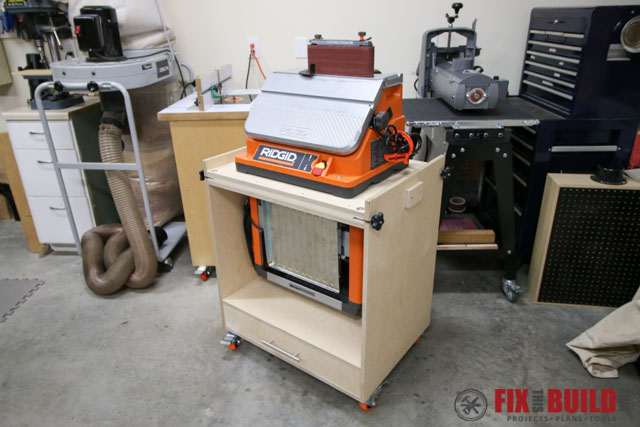
My router table is next on the wall. I built this about 7 years ago from an American Woodworker plan merged with the Norm Abram design. It’s got excellent dust collection and it’s a dream to use though I honestly don’t use it all that often.
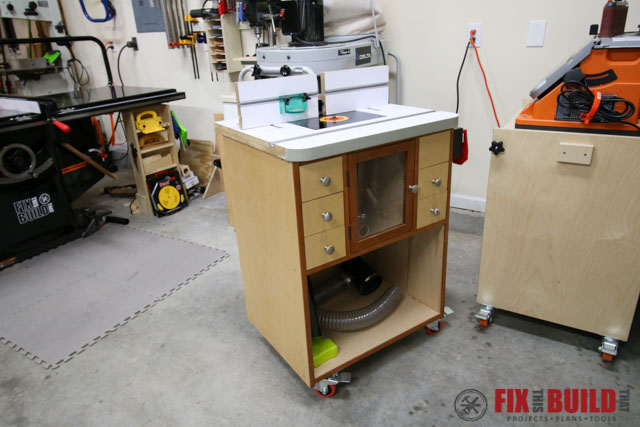
My dust collection is all run through this Delta 50-760 1.5hp unit. I have an expandable hose on it from Rockler that I move around from tool to tool as I use them. This unit has been great, but I want to upgrade to a cyclone in the future.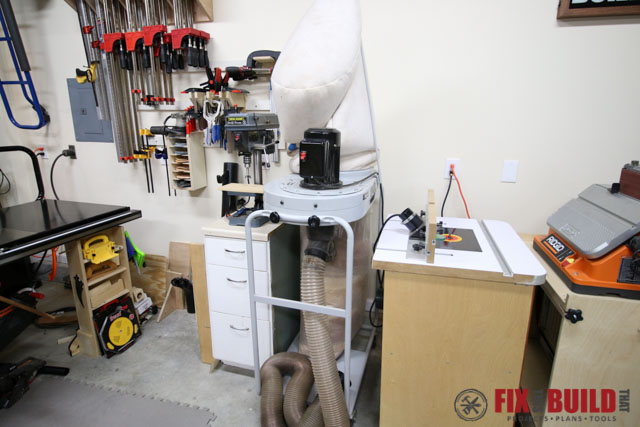
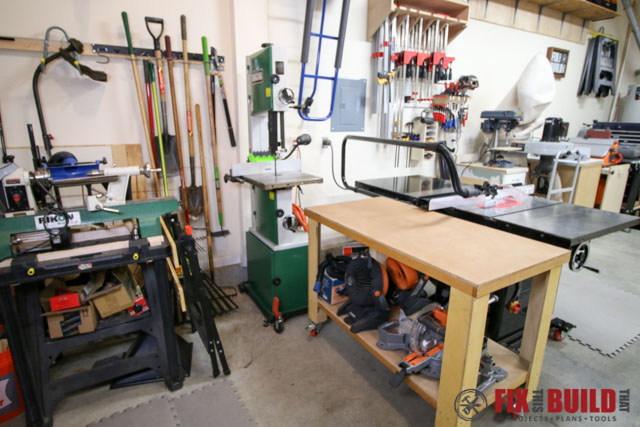
Next is the area with my tablesaw, clamps, and drill press.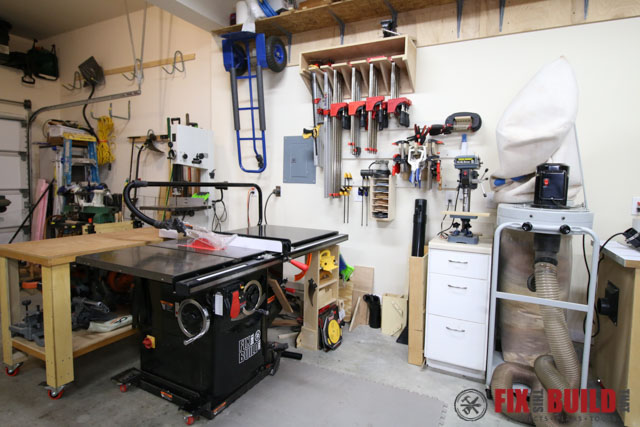
The drill press is just a little benchtop one from Harbor Freight. It’s served me well and done everything I ask it too (though not always quickly).
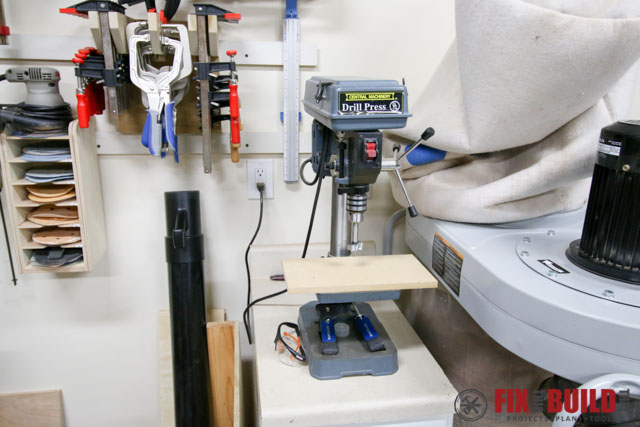
I have a Small Clamp Rack where I keep my f-clamps, spring clamps, and Kreg Jig clamps. I also have some C-clamps on a little cleat and some squeeze clamps just secured to the french cleat. Next to that I also have my Sandpaper Disc Storage Rack that holds my random orbital sander and the sanding discs I use most often.
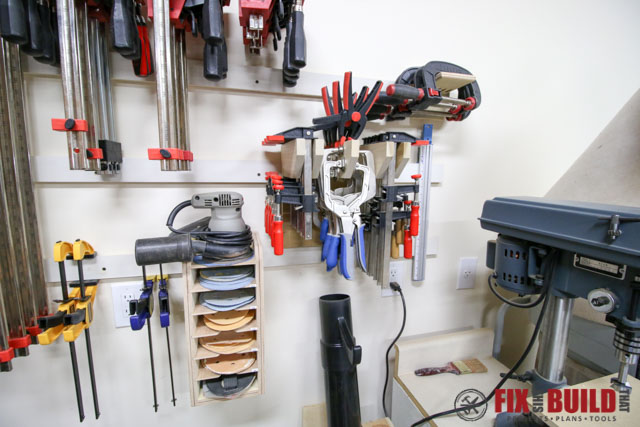
The last part of my clamp storage is my Parallel Clamp Rack. It holds up to 24 parallel clamps (6 in each slot) and a dozen or more bar clamps. It’s about 40% more efficient in wall usage than the traditional side by side storage of the clamps and can be sized up or down as needed. I love this one!
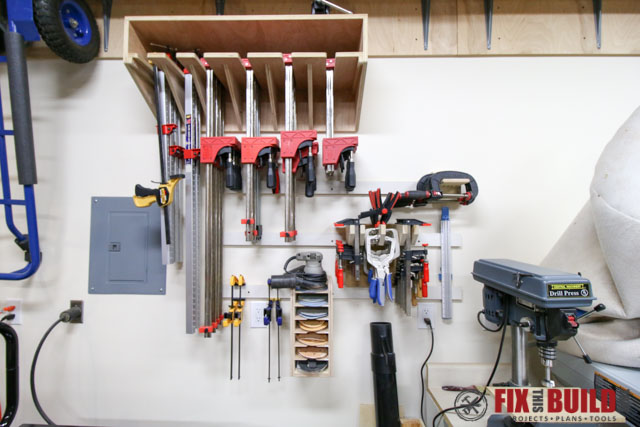
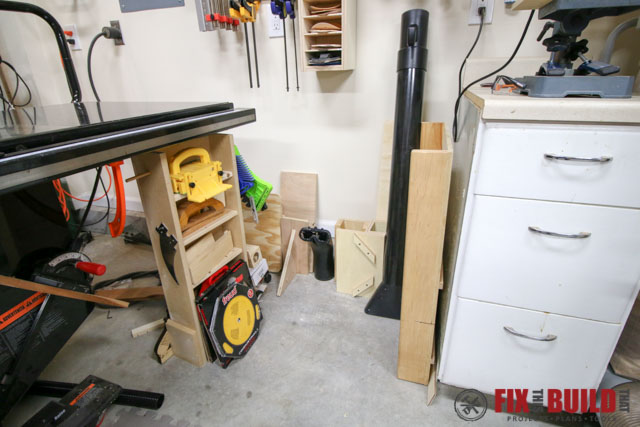
Below this area is where I store all my tablesaw accessories. I have my crosscut sled and jigs here and some pushblocks and blades stored on an old project part. This is an area I really need to clean up and I plan to make a rolling tablesaw caddy cabinet for the space.
My tablesaw is a 5hp Sawstop Industrial. It’s a very early model (2007) that I found for a great price off Craigslist a couple years ago. I don’t need 5hp but the price was too good to turn down for the last saw I’ll likely ever buy. And my buddy Paul from Fox Designs Etc sent me the awesome vinyl decals to rebadge it!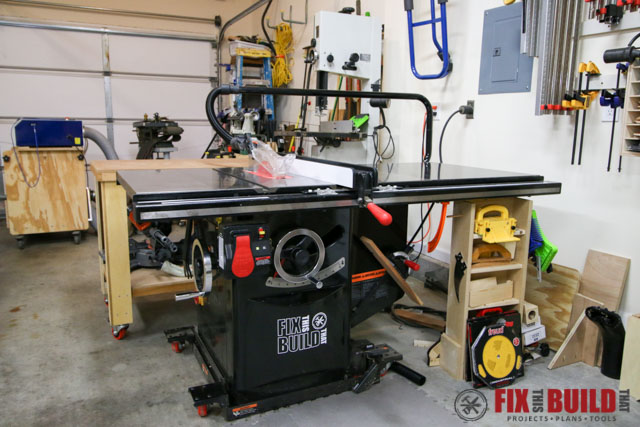
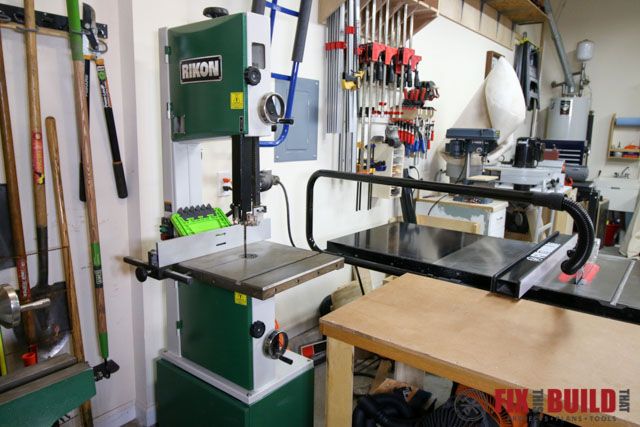
Behind the tablesaw I have a small work area with my lathe, bandsaw, and outfeed table.
I made the outfeed table many years ago. It’s actually a very similar design to the recent outfeed table Jay made except it’s 1/2″ plywood. I was using it as a staging table, but recently repurposed it back to an outfeed table. It also stores some of my other tools down below.

Next to that is my main bandsaw, a 14″ Rikon 10-325 I got used off Craigslist. I mainly use it to resaw shorter boards and don’t need access to the backside. But if I had to run some longer stock then I’ll move the outfeed table away.
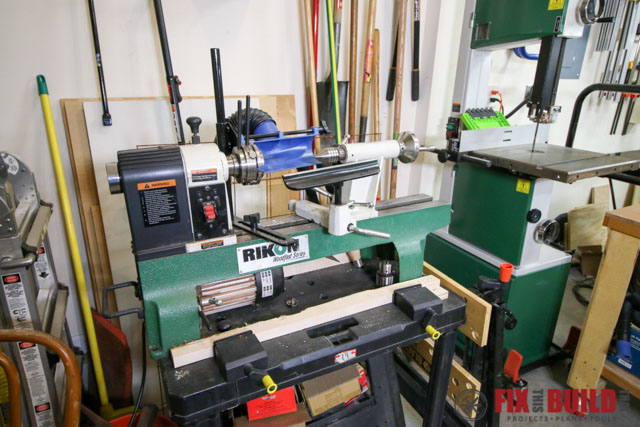
The last tool along this wall is my Rikon 70-100 mini lathe. I bought this off…you guessed it…Craigslist. It needed some overhaul and I had to replace the bearings which turned out to be a back drive shaft. But now it’s working great. I have it on a portable workbench but plan to make a mobile lathe stand for it next year.
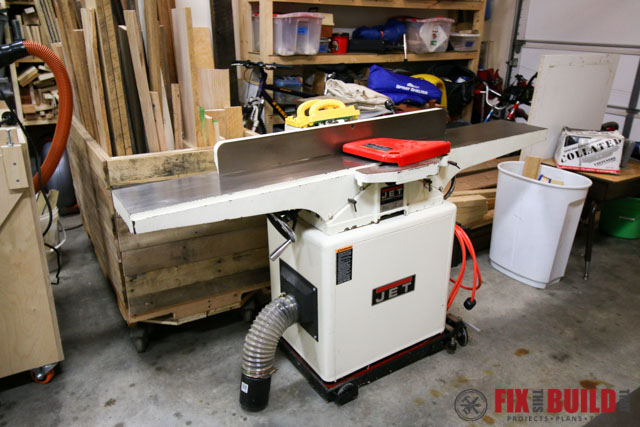
Turning around from the lathe and looking back across the shop I have my jointer and some wood storage behind it. Just to the right of this picture I have all my kids bikes and outdoor toys and some home storage shelving.
The jointer is an 8″ Jet JJ-8CS which I picked up used to replace the 6″ RIDGID I started with. The Jet needed some TLC as well to get up and running properly, but the extra bed length (66″) and the 8″ width really has come in handy over the 6″ jointer.
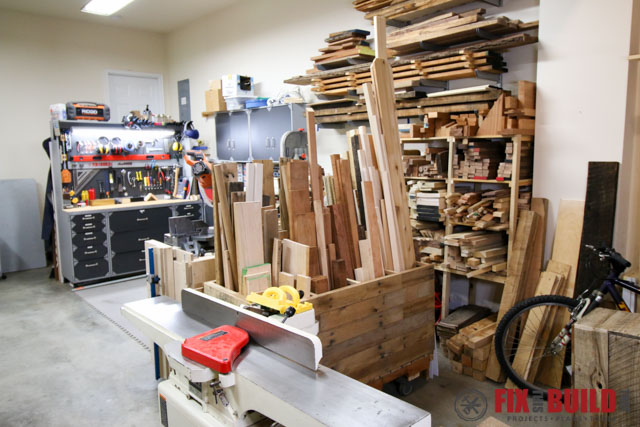
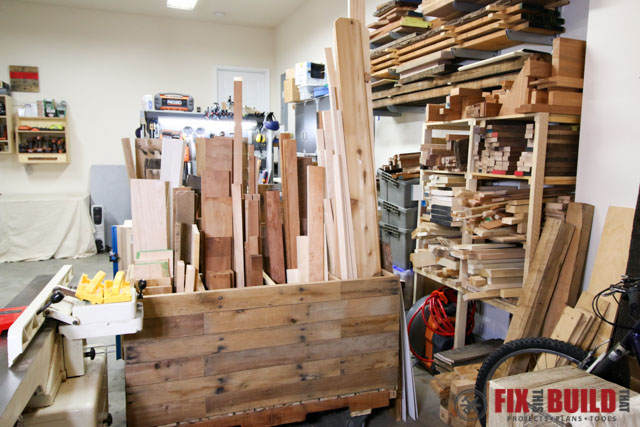
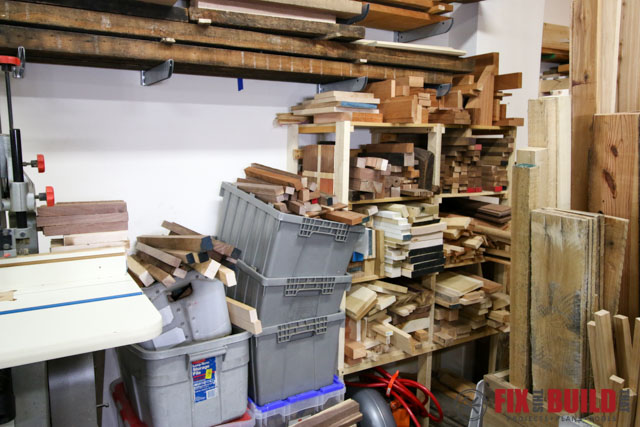
Behind the jointer I have a Mobile Wood Storage Rack. I built it to have eight 12″ x 12″ cubbies. This way I can sort the woods by species, length and size. To the right of that I have my small offcut wood storage. It’s 18″ deep an holds a lot of the stock I use to make cutting boards as well as my turning blanks in the top right. Underneath that I also have my compressor stored. And yes, I realize I save too much wood 🙂
Coming back up to the main working area of the shop I have my workbench, miter saw and smaller bandsaw. And some more wood storage on the wall of course.
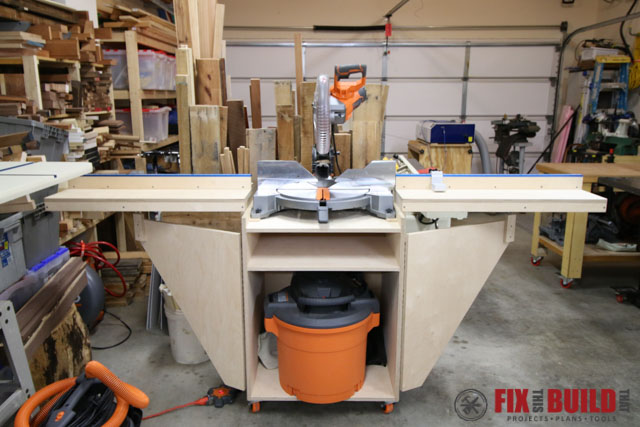
The miter saw is on my Mobile Miter Saw Station. It’s a 12″ RIDGID non-sliding version. I have it hooked up to an automated vacuum switch which turns on the shop vac when it’s running. It’s a great way to help cut down on some of the dust it spews, but I’d like to enclose it with a hood later as well.
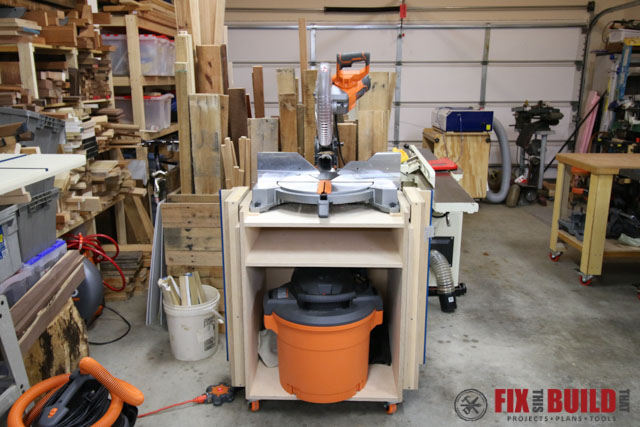
With the extension wings folded out I get just under 48″ support to each side of the blade. There is an adjustable fence on the wings that I installed the Kreg Trak System on so I can use a stop block for repeated cuts. There are plans available for this build.
Here is a view of the cutoff storage from this side of the shop. And yes, those are all bins of hardwood offcuts. My grand plan was to make a bazillion cutting boards out of them but I’ve realized I don’t have the heart for production work. Maybe I’ll work through this stuff by 2025.
I have an old RIDIGD 14″ bandsaw next to this. I never sold it when I upgraded to the Rikon 10-325 and I have the space so I figured I might as well keep it. I find that I use it a lot for rough cuts on small pieces. It’s so quick to just flip it on and cut a few inches off a cleat or something. I need to put a smaller blade like a 1/16″ on it and use it for tight curve work.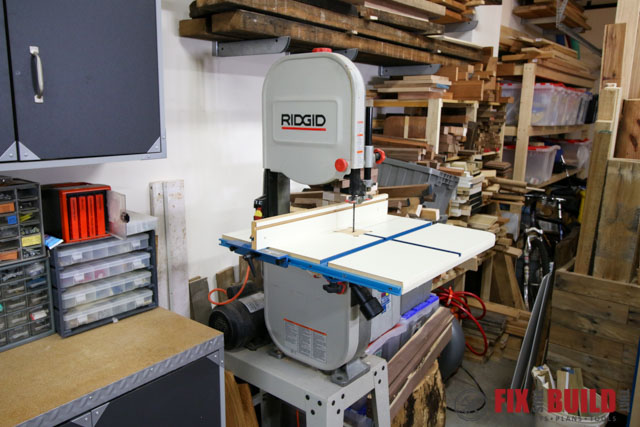
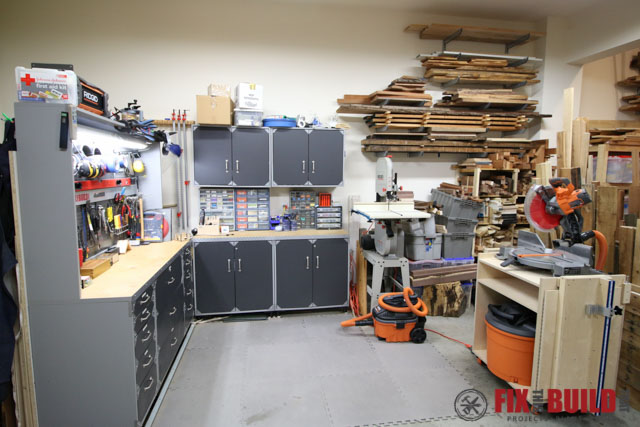
Getting into the corner I have two sets of shop cabinets. These are Coleman cabinets I got from Lowe’s many years back. This used to be my whole shop setup a few houses back when I was only doing DIY home repair work.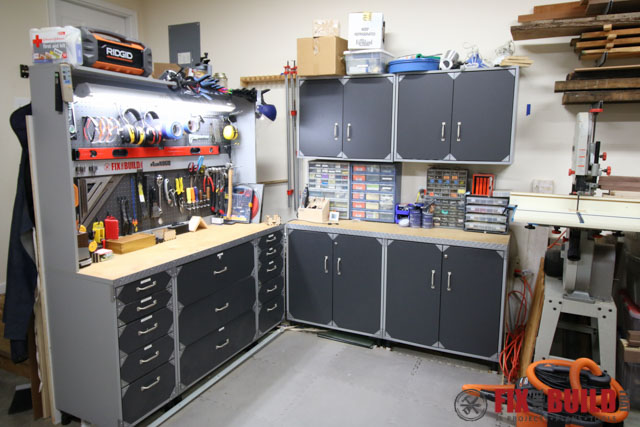
The first set of cabinets holds my finishes, glues, and solvents in the upper right cabinet. In the upper left I have my finishing supplies like gloves, rags, brushes, and other miscellaneous supplies. I have fastener storage on the benchtop that has just a ton of different hardware I’ve collected. The base cabinets hold long term storage items like my corded circ saw, plumbing bag, electrical items, etc.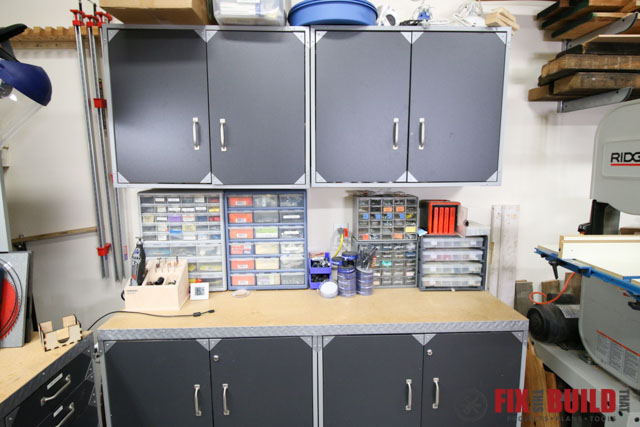
The other workbench setup has my pegboard storage where I keep my most used hand tools and items. I’ve got my safety gear, screwdrivers, measuring devices, levels and several other things…including that sweet fly swatter! Below in the drawers I have my chisels, specialty clamps, air tools, some old hand tools and some other random items. I need to overhaul the base storage because many of these have become junk drawers with no organization in them.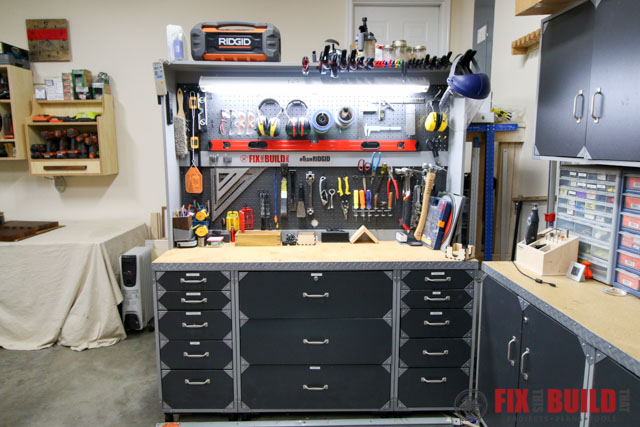
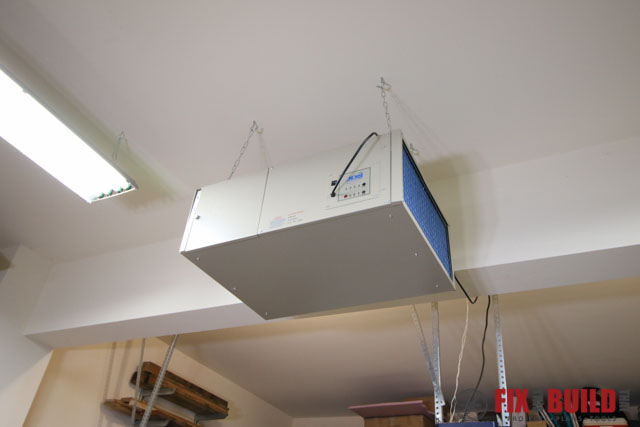
I have a JDS-750 air cleaner hanging in the middle of the shop. It does a good job exchanging the air quickly and removing the fine dust smell. For lighting I have four of the Lithonia shop lights from Home Depot in the main area. They each have four 4′ T8 bulbs in them. I run 5000k Philips tubes that give great daylight color light. I’d like to add 2 more of these in this area and 2 or 3 more back by the lathe and jointer.
The shop configuration is a work in progress. I’m somewhat limited right now with the location of my dust collector and only having 220v on the main tool wall. But it works for now and I’ll make some adjustments as I get more time with this setup.
If you want plans for any of the builds you saw here you can find them on my Project Plans page.